1.0 Purpose: To lay down the Procedure for the operation and cleaning of the bung processor.
2.0 Aim: This Standard Operating Procedure is applicable to the operation and cleaning of bung processor equipment at the Production.
3.0 Responsibility:
3.1 Trained line coordinators shall be responsible to carry out the operation as per SOP.
3.2 Officer / Sr. Officer shall be responsible supervise the process.
3.3 Head Production shall be responsible for the implementation of SOP.
3.4 Head-Quality Assurance /designee shall be responsible for compliance with SOP.
4.0 Safety Considerations:
4.1 Wear safety goggles & gloves during the operation of the bung processor.
4.2 Maintain distance during the opening & closing of the bung processor door.
6.0 Materials and reagents:
6.1 70% IPA v/v
7.0 Preparation of solutions:
Cleaning and Sanitizing Solution Preparation
8.0 Procedure on Bung Processor:
8.1 Operation:
8.1.1 Put ON the panel MCB switch located on the internal side of the panel.
8.1.2 Switch ON the control key from the panel. The PLC will be switched ON and LCD is displayed on MMI.
8.1.3 Before going to operation ensure that all the valves connected to the lines are opened and are as per the following specifications. The pressure in the gauges should not be less than the following limits:
Plant steam- 1.5 Kg/cm-2
Pure steam- 1.5 Kg/cm-2
Compressed air- 6.0 Kg/cm-2
Soft water- 1.2 Kg/cm-2
8.1.4 Select the process by pressing the button on the MMI. The vacuum leak test will display first on the LCD.
8.1.5 Before starting any process close the door and ensure that the ‘Door precondition indicator is lighting’. If the indicator glows it means the door is closed and proper.
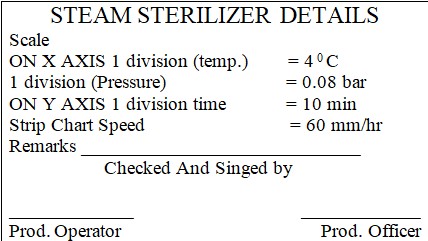
8.1.6 Switch ON to strip the chart recorder and press the record button before the start of the process. Temperature and pressure will display on the screen.
8.2 Vacuum Leak Test.
8.2.1 Before starting the leak test ensures that the chamber is dry and cool.
8.2.2 Close the door of the chamber.
8.2.3 Start the process records activity in the logbook
8.2.4 Take the printout
8.2.5 At the end of the process LCD will display ‘PROCESS END’.
8.2.6 Press the end button to process end acknowledge.
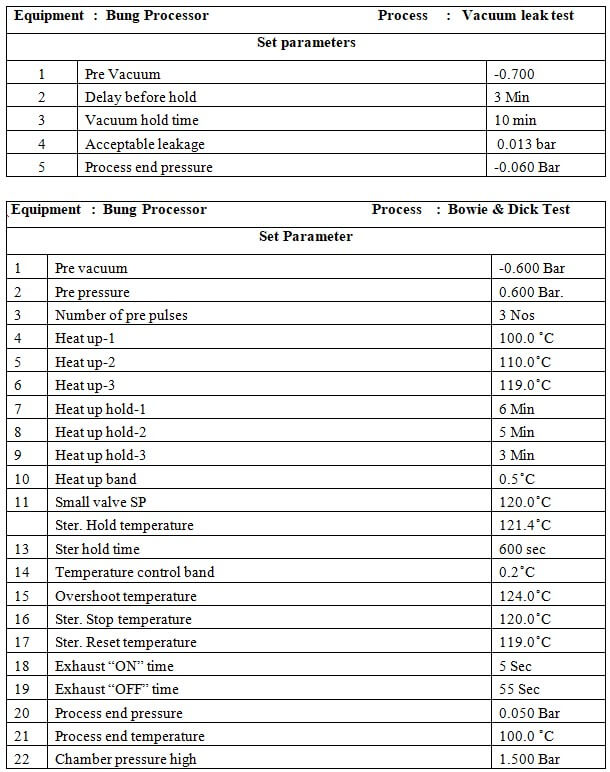
8.2.7 Check the print parameters of the vacuum leak test as per the Annexure-1
8.2.8 Daily perform leak test first and then go for the desired process.
8.3 Bowie & Dick Test:
8.3.1 Put bowie and dick test kit in the chamber in an upright position and close the door by pressing the ‘CLOSE’ button.
8.3.2 Select the ‘BOWIE AND DICK’ test by pressing the button on the MMI.
8.3.3 Set the print for parameters of the Bowie and Dick test.
8.3.4 Press the start button to start the process.
8.3.5 At the end of the process LCD will display ‘PROCESS END’
8.3.6 Press the end button to process end acknowledge.
8.3.7 Check the standard parameters of the bung process as per Annexure-I
8.3.8 Perform bowie and dick test monthly once to check the air removal system of the chamber
8.4 Standard Process:
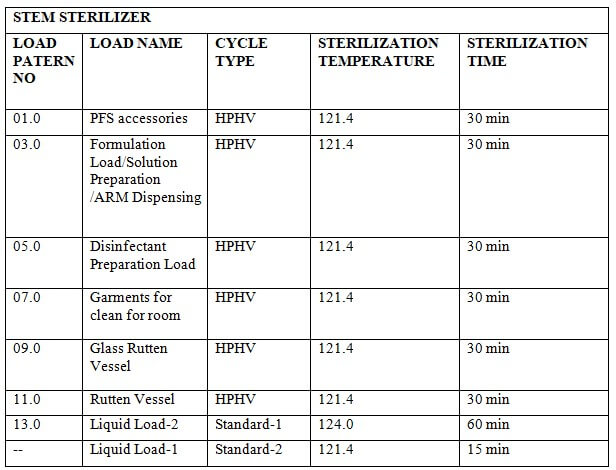
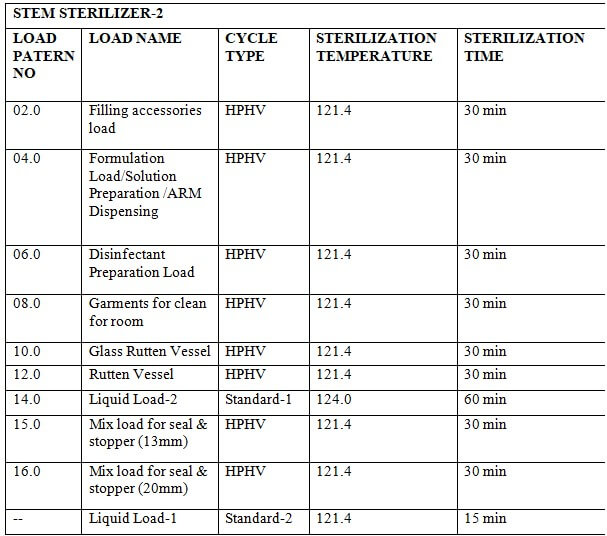
8.4.1 Place the material in the chamber as per the load pattern given in annexure-2 and press the ‘CLOSE’ button to close the door.
8.4.2 Press the button to go to the main menu and press the button to go to the start-up screen. Select ‘STANDARD PROCESS-’ by pressing the button on the MMI.
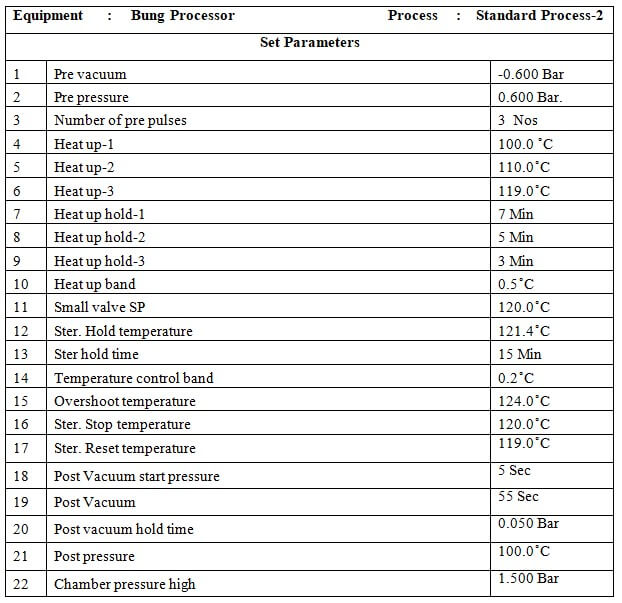
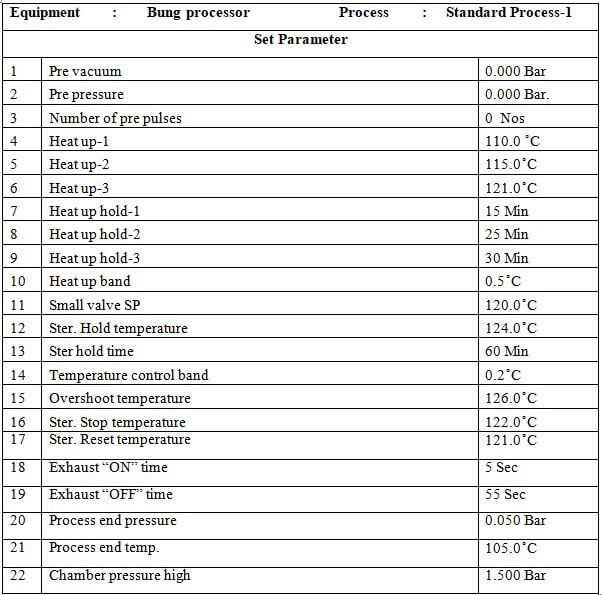
8.4.3 set parameters of the standard process.
8.4.4 Press the button to start the process.
8.4.5 At the end of the process LCD will display ‘PROCESS END’
8.4.6 Press the button to process end acknowledge.
8.4.7 Press the ST door open button on the sterile side to open the door.
8.4.8 Unload the material when the door is opened.
8.4.9 When the unloading is complete press the ST door close button to close the door.
8.4.10 When the door is closed completely press the ST door acknowledge switch on the sterile side.
8.4.11 Check the standard parameters of the standard process as per Annexure-1
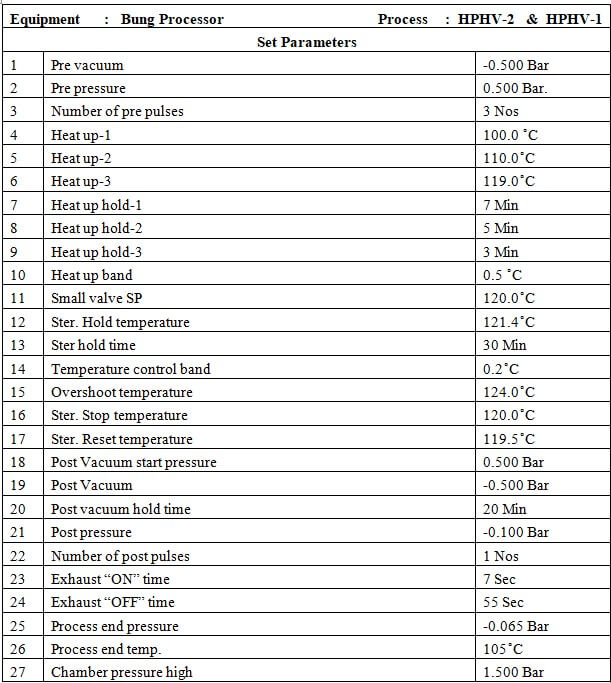
8.5 HPHV process
8.5.1 Place the material in the chamber as per the load pattern given in Annexure-2 and press the close button to ‘CLOSE’ the door.
8.5.2 Press the button to go to the main menu and then press the button to go to the start-up screen. Select ‘HPHV PROCESS’ by pressing the F3 button on the MMI.
8.5.3 Press the button to print the set parameters of the HPHV process.
8.5.4 Press the button to start the process.
8.5.5 At the end of the process LCD will display ‘PROCESS END’.
8.5.6 Press the button to process end acknowledge.
8.5.7 Press the ST door open button on the sterile side to open the door.
8.5.8 Unload the material when the door is opened
8.5.9 When the unloading is complete press the ST door close switch to close the door.
8.5.10 When the door is closed completely press the ST door acknowledge switch at the sterile side.
8.5.11 Check the standard parameters of the HPHV process as per Annexure-1.
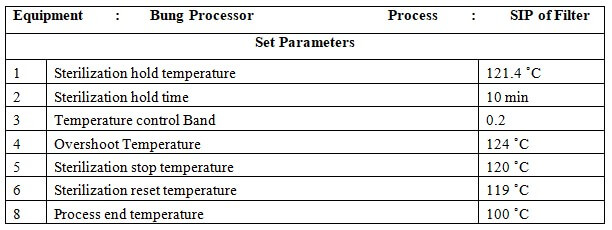
8.6 SIP of Filter:
8.6.1 Press the button to go to the main menu and again press the button to go to the startup screen select SIP of the filter by pressing the button on the MMI.
8.6.2 Set parameters of SIP.
8.6.3 Press the button to start the process.
8.6.4 At the end of the process LCD will display ‘PROCESS END’.
8.6.5 Press the button to process end acknowledge.
8.6.6 Check the standard parameters of SIP as per Annexure-1.
8.6.7 Perform integrity and SIP of the filter once a month.
8.7 Cleaning:
8.7.1 Clean the chamber once a day before the vacuum leak test or if spillage occurs during the cycle by using IPA 70% v/v with a soft lint-free mop.
8.7.2 Clean the bung processor externally with IPA 70% v/v.
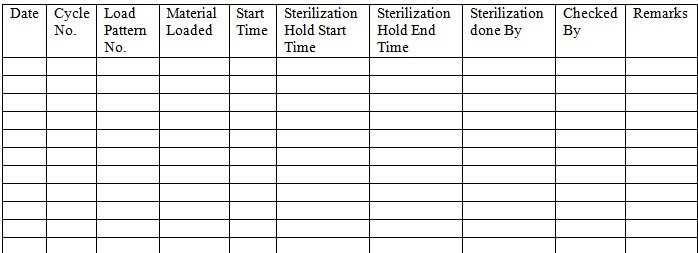
NOTE: The activities performed on the bung processor should be recorded in the logbook as per Annexure-3. The strip chart should be attached to the printout along with the stamp.
9.0 Reporting:
9.1 Record the detail after completion of a cycle in Annexure No. 3.
9.2 Record the detail of filling, formulation, solution, and ARM dispensing.
9.3 After completion of the cycle attach the strip chart along with the stamp.
10.0 Abbreviations:
PR: Production
ID No. : Identification Number
No. : Number
QA: Quality Assurance
Rev.: Revision
SOP: Standard Operating Procedure
LCD: Liquid Crystal Display
PLC: Programmable Logic Controller
MMI: Man-Machine Interface
VFP: Vaccine Formulation Plant
MCB: Master Circuit Breaker
DHS: Dry Heat Sterilizer
QC: Quality Control
L: Liter
ml: Milliliter
˚C: Degree Celsius
LAF: Laminar Air Flow
ST: Sterile
Ltd., Limited
Sr.: Senior
EQ: Equipment
IPA: Isopropyl alcohol
v/v. : Volume/Volume
% : Percentage
Kg/cm¬2: Kilogram/Centimeter square

Naresh Bhakar is the Founder and Author at Pharmaguddu.com, bringing his extensive expertise in the field of pharmaceuticals to readers worldwide. He has experience in Pharma manufacturing and has worked with top Pharmaceuticals. He has rich knowledge and provides valuable insights and data through his articles and content on Pharmaguddu.com. For further inquiries or collaborations, please don’t hesitate to reach out via email at [email protected].
