
Quality Control Specialist | Industry Experience
✓ Reviewed by: Pankaj Sharma - Quality Control Specialist
Reviewed for Quality Control accuracy, laboratory practices, analytical methods, and technical relevance
📅 Last Updated: October 31, 2026
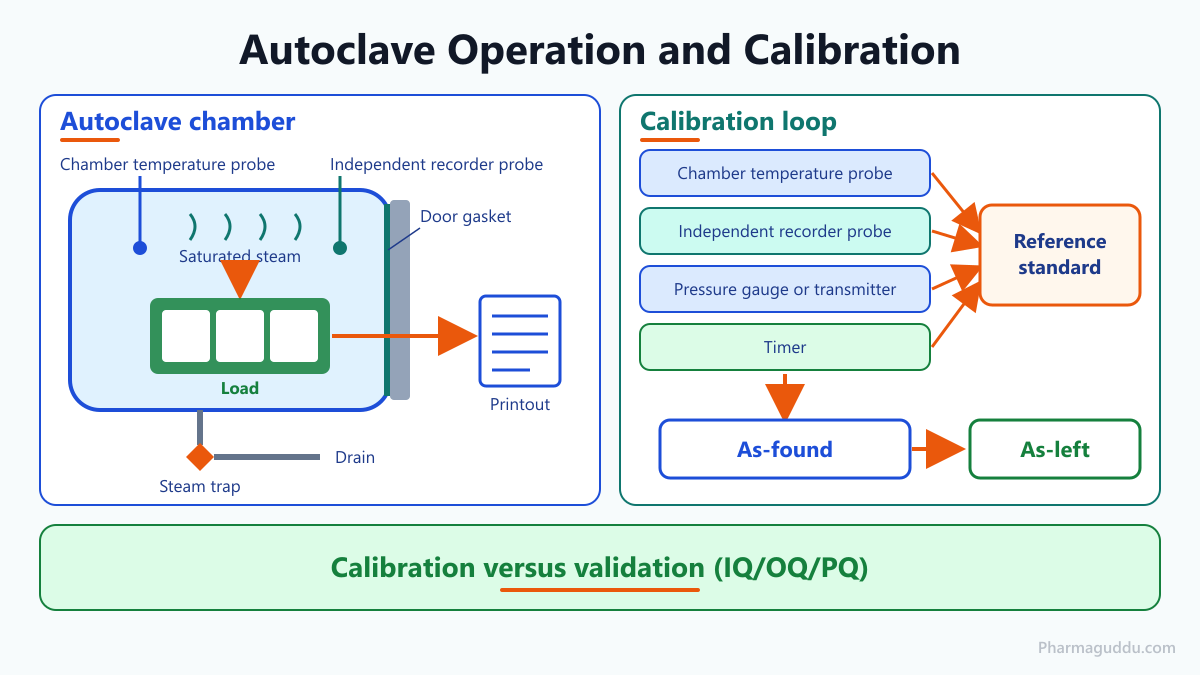
An SOP on operation and calibration of autoclave tells staff how to run a steam sterilisation cycle safely. It also tells them how to keep the temperature, pressure and timer readings correct. Operation covers utility checks, air removal and leak tests. It also covers loading, the cycle, unloading and records. Calibration compares each instrument with a traceable standard and records the error. Calibration is not validation: IQ/OQ/PQ proves the cycle reaches sterilising conditions in the load. Indicator tape shows exposure only. It never shows sterility.
What Is the SOP on Operation and Calibration of Autoclave?
An autoclave is a closed steel chamber that sterilises materials with saturated steam under pressure. The SOP is the approved document that says how to run it, how to record each cycle and how to keep its instruments accurate.
Objective: to lay down the procedure for operating, recording and calibrating the autoclave.
Scope: every steam autoclave in microbiology, QC or production. These sterilise media, glassware and garments. They also sterilise equipment parts or waste.
Responsibility: the technical operator runs the cycle and fills the logbook.
The QC analyst or production officer reviews the printout.
Engineering staff calibrate and maintain the unit.
The QA officer approves records and deviations.
The head of department (HOD) is responsible for compliance.
How Does an Autoclave Kill Microorganisms?
Saturated steam gives up heat when it condenses on a cooler surface, and that heat kills microbes. The sterilising parameter is temperature. Pressure only follows it, because saturated steam at a given temperature always has the same pressure.
Eupry’s validation guide gives the common conditions: 121 °C at about 15 psi (about 1 bar) gauge. It also gives 132–134 °C at about 2 bar gauge. These are gauge pressures, read above atmospheric pressure. Hold time depends on the load and the validated cycle. Air left in the chamber lowers the steam temperature at that spot, which is why air removal matters.
What Are the Main Parts and Which Ones Need Calibration?
Description of autoclave parts lists the following.
- Chamber: jacketed or single-wall stainless steel.
- Steam supply or generator: plant steam, pure steam or an internal heater with DM water.
- Air-removal system: a vent valve (gravity type) or a vacuum pump (pre-vacuum type).
- Door: gasket and safety interlocks.
- Safety valve: releases pressure above the set limit.
- Steam trap and drain: removes condensate.
- Controller: PLC or microprocessor with a printer.
- Sensors and gauges: temperature probes, pressure transmitter and gauge, timer.
The calibration SOP covers the chamber temperature probe (Pt100, a platinum resistance sensor), the independent recording probe, the pressure gauge or transmitter and the timer. Annex 1 clause 8.50 expects you to record each heat cycle with accurate equipment. It also expects duplex probes on independent control and monitoring systems. Those systems must be able to abort or fail a cycle that does not match the validated parameters.
Gravity Displacement or Pre-Vacuum: Which Tests Apply?
| Feature | Gravity displacement | Pre-vacuum |
|---|---|---|
| Air removal | Steam pushes air out through a vent | Vacuum and steam pulses remove air |
| Typical load | Media, glassware, liquids | Porous, wrapped and hard goods |
| Typical cycle | 121 °C, 15–30 min for lab loads | 132–136 °C (134 °C nominal), 3–18 min by load |
| Air removal test | Not applicable | Daily |
| Vacuum leak test | Not applicable | Weekly |
Exact values depend on the manufacturer and model; always follow your OEM manual and site SOP.
How Do You Operate an Autoclave? Step-by-Step Process Flow
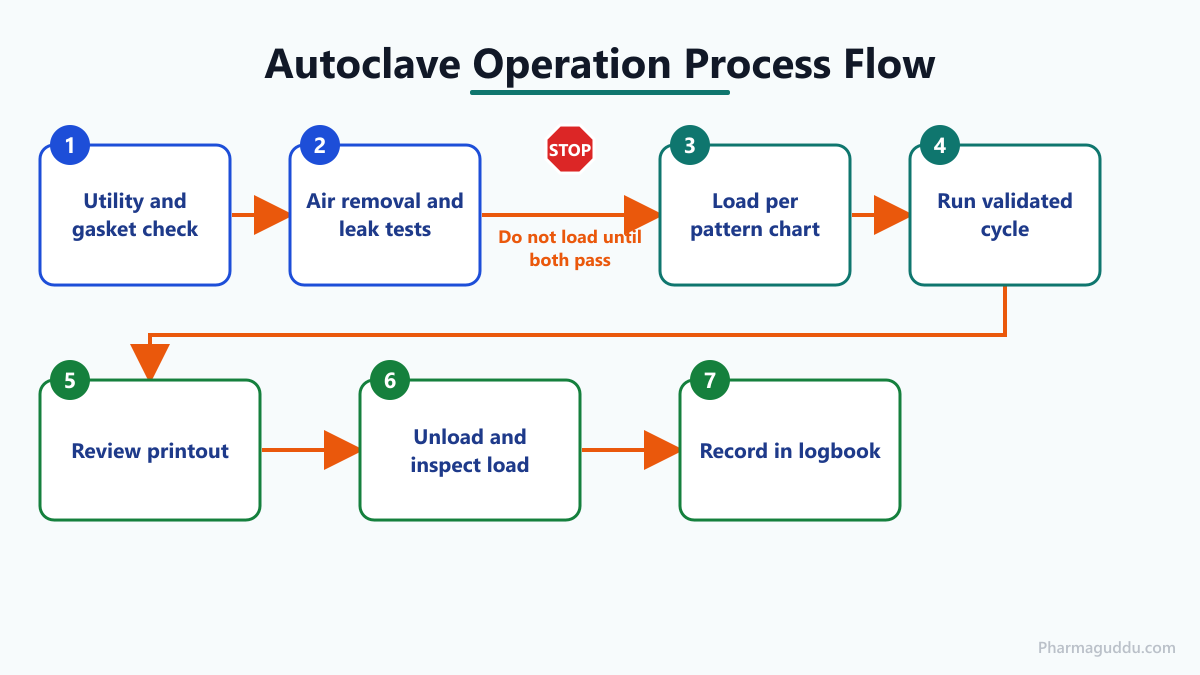
- Utility and gasket check. Read the last logbook entry, any open breakdown and the calibration label. Do not use the unit if the label is overdue. Check steam, water and compressed air supplies, the drain strainer and the door gasket. On a top-loading unit, keep the heating coil covered with DM water.
- Air removal and leak tests. On pre-vacuum units, run the air removal test (Bowie-Dick test) before the first load. Run the vacuum leak test on the weekly day. Do not load until both pass.
- Load per pattern chart. Follow the validated load pattern chart. Pack items dry, in wrapping that lets air out and steam in. Never sterilise sealed containers. Loosen caps on bottles.
- Run validated cycle. Close and lock the door. Select the validated cycle and note its unique cycle identifier. On a gravity unit, vent until steam flows steadily, then close the vent valve.
- Review printout. Check that the whole load reached temperature before the hold timer started. On pre-vacuum cycles, confirm the drain temperature record. Compare temperature, pressure and time with the cycle limits.
- Unload and inspect load. Wait until the gauge reads zero. Never open the door under pressure. Wear heat-resistant gloves and goggles, open the door away from your face and exhaust liquids slowly. Inspect every item for dryness, damaged packs and moisture. Remove any item that fails and report it.
- Record in logbook. Enter the cycle identifier, load, times, readings and signature (Annexure I). Mark the load as sterilised. The QA officer reviews the sterilisation record as part of batch release.
Annex 1 clauses 8.45 and 8.56–8.58 support these records and checks. Tape or a colour-change sticker shows the process occurred, nothing more.
Key Operating Parameters
| Parameter | Typical value | Note |
|---|---|---|
| Temperature, liquids and glassware | 121 °C minimum, hold 15–30 min | Validated per load |
| Temperature, porous load | 132–136 °C, hold 3–18 min | 134 °C nominal |
| Chamber pressure | About 1.0 bar (15 psi) gauge at 121 °C; about 2.0 bar (30 psi) gauge at 134 °C | Gauge pressure |
| Leak test | Pressure rise of 1.3 mbar/min or less | Eupry value; manufacturer limit governs |
| F0 | Equivalent minutes at 121 °C, with z = 10 °C | Overkill cycles are commonly set at 12 min or more |
How Do You Calibrate an Autoclave?
Calibration means comparing an instrument with a traceable reference and recording the error. Use reference standards traceable to national standards, ideally from an ISO/IEC 17025 accredited laboratory.
| Instrument | Method | Points |
|---|---|---|
| Chamber temperature probe | Compare with a reference probe placed beside it | Working temperatures, such as 121 °C and 134 °C |
| Independent recorder probe | Compare with the reference and with the controller | Same points |
| Pressure gauge or transmitter | Compare with a reference gauge, in gauge pressure | Working pressures |
| Timer | Compare with a calibrated stopwatch over a hold period | Hold time |
- The QA officer approves the calibration plan. Engineering staff isolate the empty autoclave.
- Record the as-found readings before any adjustment.
- Adjust only if a reading is outside the tolerance in the approved SOP. Record the as-left readings.
- Attach a label with the calibration date, due date and initials.
- Complete Annexure IV. The QA officer approves it.
Many plants calibrate every 6–12 months and after major repair. Regulations set no fixed interval. 21 CFR 211.68(a) asks for routine calibration, inspection or checking under a written program.
If an instrument is out of tolerance, open a deviation. Then assess every cycle run since the last good calibration. For example, if the chamber probe read higher than the reference, the real chamber temperature was lower than the printout showed. Those loads need review and possible re-sterilisation.
Preventive Maintenance
Check the door gasket and drain strainer every day. Test the vacuum weekly. Service the steam trap, safety valve and vent filter on the manufacturer’s schedule, and replace the gasket when it hardens or cracks. Trend cycle data and probe drift, because slow drift often shows before a failure.
Data Integrity of Autoclave Records
Keep the printout with the logbook entry. On PLC units, restrict user access and keep the audit trail on. Record corrections with date, reason and signature, never by overwriting.
- Test before loading: run the air removal and leak tests first. A failed test costs minutes; a failed load costs a batch.
- Read the printout, not the tape: the physical record is your evidence of the cycle.
- Label sterilised loads: use the cycle identifier so anyone can trace the load.
- Respect load patterns: a packed chamber traps air and gives wet loads.
- Calibrate in gauge pressure: state the unit on the record so nobody confuses it with absolute pressure.
- Never rush the door: wait until the gauge shows zero.
Annexures
Annexure I: Daily Usage Logbook
| Date | Cycle identifier | Load | Start/end time | Hold temp/pressure | Printout attached | Operator | Reviewed by |
|---|---|---|---|---|---|---|---|
Annexure II: Air Removal Test (Bowie-Dick Type) Record
| Date | Test pack lot | Cycle temp/time | Result (uniform/not) | Operator | QA officer |
|---|---|---|---|---|---|
Annexure III: Weekly Leak Test Record
| Date | Hold time | Pressure rise | Limit | Pass/fail | Operator |
|---|---|---|---|---|---|
Annexure IV: Calibration Record
| Instrument | Reference ID/certificate | Set point | As-found | As-left | Tolerance | Pass/fail | Next due |
|---|---|---|---|---|---|---|---|
Annexure V: Cycle Printout Review
| Cycle identifier | Whole load at temperature before hold | Hold time met | Drain temp recorded | Load dry and packs intact | Reviewer |
|---|---|---|---|---|---|
Annexure VI: Breakdown/Deviation Record
| Date | Description | Load status | Immediate action | Root cause | Impact on earlier cycles | QA approval |
|---|---|---|---|---|---|---|
Annexure VII: Load Pattern Chart
| Load type | Container/pack | Maximum quantity | Position in chamber | Cycle | Revalidation date |
|---|---|---|---|---|---|
Frequently Asked Questions
Lab loads and media commonly run at 121 °C (about 15 psi gauge) for 15–30 minutes. Pre-vacuum cycles for porous loads run around 134 °C for shorter holds. The validated cycle for each load defines the final time, so follow the approved cycle rather than a general figure.
Regulations require a written calibration program but give no fixed interval. Many plants calibrate temperature, pressure and timer every 6–12 months, and again after major repair. The site sets the interval by risk assessment and records it in the calibration SOP.
Calibration checks that the sensors, gauge and timer show correct values against a traceable standard. Validation (IQ/OQ/PQ) proves the cycle delivers sterilising conditions to every part of the load. A calibrated autoclave is not automatically validated, and a validated one needs calibrated instruments.
It is a test cycle on an empty pre-vacuum chamber with a test pack. A uniform colour change shows the chamber had no trapped air and steam reached the pack. Annex 1 clause 8.61 expects it normally daily, or an air detector system as the alternative.
No. Annex 1 clause 8.44 says such indicators show only that the sterilisation process occurred. Assurance comes from the validated cycle, the recorded temperature, time and pressure, and periodic biological indicators.
Record the date, unique cycle identifier, load description, start and end times, hold temperature and pressure, operator and reviewer, and attach the printout. Annex 1 clause 8.45 requires a sterilisation record for each run, reviewed during batch certification. Failures need a deviation record.
References
- EU GMP Annex 1: Manufacture of Sterile Medicinal Products, European Commission (2022)
- Validation, Cleaning Validation, PIC/S, 2007
- Plant SOP (library)

Pankaj Sharma — Quality Control Specialist
Pankaj Sharma is a pharmaceutical QC professional who reviews our technical content for GMP accuracy, laboratory practices, and regulatory relevance.