GMP & Pharmaceutical Manufacturing Expert
✓ Reviewed by: Pankaj Sharma - Quality Control Specialist
Reviewed for Quality Control accuracy, laboratory practices, analytical methods, and technical relevance
📅 Last Updated: June 28, 2023
1.0 Objective: To lay down a procedure for cleaning, Operation, and Calibration of Disintegration test apparatus.
2.0 Scope: This procedure is applicable to the cleaning, operating, and calibration of the Disintegration test apparatus used in the production department.
3.0 Responsibility:
Officer, Executive – Production Department
Manager – Production Department, QA Officer – In the process
4.0 Procedure:
4.1 Cleaning
4.1.1 Cleaning of basket and disc
4.1.2 Clean the basket of the disintegration apparatus with 5-10 liters of purified water.
4.1.3 Dry the body with a wet lint-free duster.
4.1.4 Clean the basket and discs after every disintegration test.
4.1.5 Cleaning of water bath
4.1.5.1 Clean the water bath with 5-10 liters of purified water.
4.1.5.2 Dry the body with a wet lint-free duster.
4.1.5.3 Clean the water bath after every week.
4.2 Operation
4.2.1 Ensure the cleanliness of the instrument.
4.2.2 Switch ‘ON’ mains Switch.
4.2.3 Put the power switch ‘ON’ on the rear panel.
4.2.4 Set the conditions: (Be sure that water is filled up to the mark in the water tank).
4.2.5 Setting the temperature
4.2.5.1 Press the “SET” key the yellow LED starts glowing.
4.2.5.2 Press the ‘TEMP’ key, and the right digit of the previously set temperature on the temperature screen starts blinking.
4.2.5.3 Set the required temperature by pressing the Up/Down keys. After the required setting, press the “DISP SEL” key to change the position of the blinking digit. After completing the setting press the “ENTER” key to store the temperature set in the instrument’s memory.
4.2.6 Setting the timer
4.2.6.1 Press the “SET” key the yellow LED on the right side starts glowing.
4.2.6.2 Press the “TIMER” key, and the right digit of the previously set time starts blinking.
4.2.6.3 Enter the required time in minutes by pressing the up / down keys. After the required setting, press the “DISP SEL” key to change the position of the blinking digit. After completing settings press the “ENTER” key to store the time set in the instrument’s memory.
4.2.6.4 Press the “TEMP” key to start the heating of water in the water tank. The red “LED” starts glowing.
4.2.6.5 Take two 1000 ml beakers and fill them with purified water/specified media up to the ¾th level. Place them in the instrument.
4.2.6.6 Take the temperature of the selected area by keeping the external probe in that area and press the “PROBE SEL” key. The LED of the “EXT.” position starts glowing and the temperature of that area will be displayed.
4.2.6.7 After attaining the set temperature, place the tablets in the basket (use discs, if required), fix them on the clamps, and start the test by pressing the “START/STOP” key. The instrument will automatically stop after completing the set time.
4.2.6.8 To halt the test, press the “TIMER” key. The green LED of the “TIMER” key start flashing and the time stops increasing. To continue the test press the “TIMER” key once more.
4.2.6.9 To stop the test whenever required press the “START/STOP” key, and the test will stop.
4.2.6.10 Clean the baskets, discs, and beakers for next use.
4.2.6.11 Put “OFF” the instrument from the rear panel and switch “OFF” the mains.
Related SOP: SOP on Operation of Tablet inspection belt
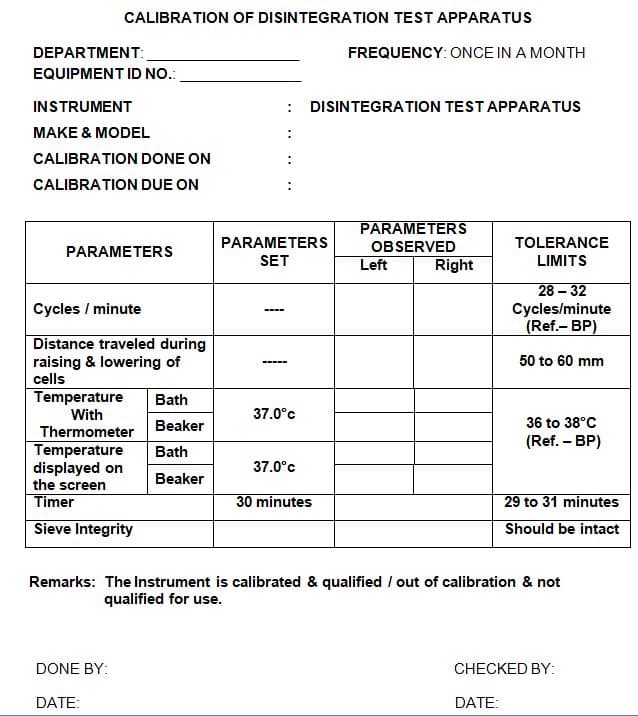
4.3 Calibration
4.3.1 Operate the Instrument as per step no. 4.2.
4.3.2 Start the machine and count the number of cycles per minute and record the same in Annexure- I.
4.3.3 Check the distance traveled by the mechanical device holding the cells and the discs by using vernier calipers and record the same in Annexure- I. Ensure that the mechanical device holding the cells and discs should be moving smoothly through a distance of 50 to 60 mm at a constant frequency.
4.3.4 Note the number of cycles per minute by using a calibrated stopwatch and record the same in Annexure-I.
4.3.5 Set the required temperature, start the heater of the machine, and keep the instrument maintained at a stable temperature.
4.3.6 Check the temperature of the water bath with a calibrated thermometer and note it down in Annexure-I.
4.3.7 Set the timer for 30 minutes and start the machine and the calibrated stopwatch simultaneously. Note down the stopwatch reading immediately when the machine stops.
4.3.8 Check the integrity of the sieve attached to the baskets visually and record the same in Annexure-I.
4.3.9 Affix calibration status label duly filled and signed on the equipment after completion of calibration.
4.3.10 In case of any discrepancies are observed, inform the Head of the department and the engineering department of the corrective action. Put an ‘UNDER MAINTENANCE’ tag on the machine.
4.3.11 Recalibrate the machine after the rectification of the machine and enter the same in Annexure-I.
4.3.12 The frequency of calibration is once a month.
4.4 Precaution
4.4.1 Do not start the temperature controller till the water in the bath is filled up to the marked level without beakers.
4.4.2 Do not try to remove the baskets till they are disengaged from the hook.
4.4.3 Do not clean the bath with any strong solvent. Use purified water for cleaning.
4.4.4 The external probe shall be handled carefully.
5.0 Abbreviations:
SOP: Standard Operating Procedure
mm: Milliliters
QA: Quality Assurance

Naresh Bhakar is the Founder and Author at Pharmaguddu.com, bringing his extensive expertise in the field of pharmaceuticals to readers worldwide. He has experience in Pharma manufacturing and has worked with top Pharmaceuticals. He has rich knowledge and provides valuable insights and data through his articles and content on Pharmaguddu.com. For further inquiries or collaborations, please don’t hesitate to reach out via email at [email protected].