1.0 Purpose: To lay down the procedure for the operation and cleaning of tunnel sterilizer.
2.0 Aim: This Standard Operating Procedure is applicable for the operation and cleaning of depyrogenation tunnel installed in production.
3.0 Responsibility:
3.1 The line coordinators who are trained shall carry out the operation and cleaning process as per SOP.
3.2 Officers/ sr. officers shall supervise the process.
3.3 Manager Production shall be responsible for the implementation of SOP.
3.4 Head of quality assurance shall be responsible for compliance with SOP.
4.0 Safety considerations:
4.1 Doors safety, Door obstruction safety switches should not be bypassed
4.2 Don’t clean the machine with any solvent, when it is hot
4.3 Don’t go for cleaning of the parts during operation.
4.4 Don’t climb on the machine during production
4.5 Don’t reach over open–top protection covers
5.0 Procedure for Tunnel sterilizer:
5.1 Operation of de-pyrogenation tunnel:-
5.1.1 The operation of the machine is based on the touch screen selection on the PLC which is connected to the tunnel and the specific step of process activation can identify by a color change from red to green.
5.1.2 First select the button on the touch screen of the PLC of de-pyrogenation tunnel which turns from red to green color as in the picture below.

5.1.3 Check the availability of utilities like compressed air and cooling water required for the operation of de-pyrogenation tunnel.
5.1.4 Select the option on the PLC screen and check the parameters required for the operation based on the format.
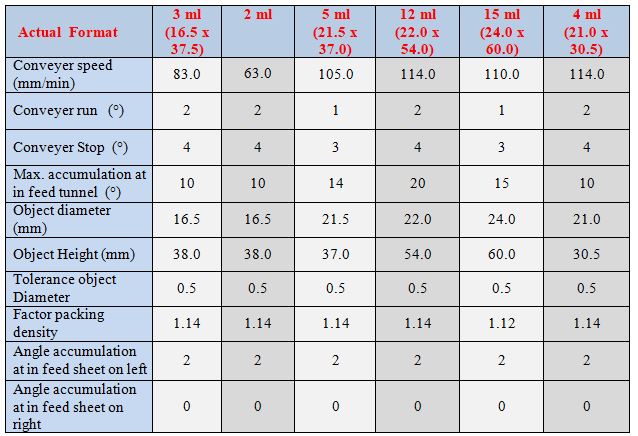
5.1.5 Check all the parameters and change if necessary on the PLC screen, required for carrying out the process by logging on based on the level of operation.(as per the Annexure – 2 & 3) and ensure that sterilization data is recorded properly in JUMO.
5.1.6 The parameters in further data – air speed, pressures, shutter/pusher, temperature, calibration, controllers, and filter temperature are stored as per the machine settings for all the parameters and need not change frequently.
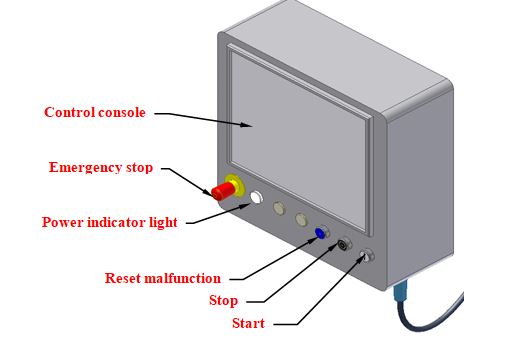
5.1.7 For the selection of the operation mode the respective functional key button has to be pressed on the operating panel.
5.2 Operation of depyrogenation tunnel (MANUAL MODE ):-
5.2.1 Select < MANUAL MODE > on the operational panel and check required
working stations on the screen.
5.2.2 Plugin jog button in the operating console and switch on the machine drive with the button below the operating panel.
5.3 Operation of Depyrogenation Tunnel (AUTO MODE ):-
5.3.1 Select < AUTO MODE> on the operational panel and check the required working stations on the screens.
5.3.2 First use the log user password (3, 5, and 7 levels) for any change in the parameters and set predesigned and duly saved data in PLC.
5.3.3 Select the format size, as per plan by pressing the touch screen button then select the required format and select the change of format size option on the PLC.
5.3.4 Before starting, see the panel for any type of error description.
5.3.5 After completion of vials washing, from the washing machine the vials are transported to the infeed zone of the tunnel by the discharge scroll of the washing machine.
5.3.6 Start the batch by selecting the option on the operating panel.
5.3.7 Initially heat up/ start-up process is carried out either manually or in auto mode:
5.3.7.1 Run the tunnel empty. Place the support latch to ensure that the first vials are fed smoothly into the tunnel and it is installed at the sealing partition after the heating zone.
5.3.7.2 Press the button twice on PLC for closure of inlet shutter IET only when all the vials are pushed beyond the infeed dead plate.
5.3.7.3 Run the machine with the ejection latch placed on the conveyor. Once all the vials are removed along with the ejection latch, press the button on the right corner of PLC with the message
5.3.7.4 Erase all the messages on the header of PLC (Guard door should be closed, accumulation at the rotary plate, infeed rotary should be on operation, etc) by cross-checking all the messages.
5.3.7.5 When the green indicator on the discharge shutter turns grey two messages will display on PLC i.e. < RETURN THE SUPPORT LATCH> with red background and with green background.
5.3.7.6 Select and allow the shutter to close.
5.3.7.8 After the shutter gets closed, stop the batch and put ‘OFF’ the run empty button, and put ‘OFF’ in the sterile mode.
5.3.7.9 When the message with the red background will reflect on the PLC. Select the button and return the support latch.
5.3.7.10 Allow the latch to come back to the starting position in the drying zone of the tunnel.
5.4 Infeed zone (Module ET):-
5.4.1 The infeed zone transfers the vials from the feed to the heating zone.
5.4.2 The infeed partition opens automatically after an adjustable number of vials in rows have been pushed onto the tunnel conveyor.
5.4.3 In the infeed section, the bottom of the vials are heated up to evaporation of any residual moisture present inside the vials with help of infrared radiators installed under the conveyor.
5.4.4 Before entry to the heating zone the presence of the vials is checked with a light barrier. The partition opens automatically when objects are detected in front of the partition.
5.5 Heating zone (Module HT):-
5.5.1 Heating zone is used for the sorted transfer of the vials from the infeed zone under continuous laminar flow.
5.5.2 It is designed for continuous processes of sterilization and depyrogenation of the glass vials.
5.5.3 The glass vials are exposed to the temperature as per the set point mentioned in Annexure-03.
5.5.4 Pressure in the heating zone is always higher than in the infeed and cooling zone.
5.5.5 After sterilization the vials are transported to the cooling zone.
5.6 Cooling zone:-
5.6.1 In this zone, vials are cooled by cold air under laminar flow.
5.6.2 The temperature of the vials at the outfeed end of the tunnel depends on the set point.
5.6.3 After cooling the vials are transported to the machine discharge on the wire conveyor.
5.7 Discharge procedure:-
5.7.1 This includes the removal of all the vials in the tunnel and it is done manually.
5.7.2 Place the ejection latch in the infeed zone of the tunnel.
5.7.3 Select the < DISCHARGE TUNNEL> option and press < START > button on the PLC.
5.7.4 Then press the button.
5.7.5 Then conveyor belt of the tunnel transport the vials with the ejection latch to the discharge from the tunnel.
5.7.6 Select the option and press the button on the PLC and the ejection latch is removed at the tunnel discharge manually.
5.7.7 After the vials along with the latch are removed from discharge, then check for the presence of any vials in the tunnel.
5.7.8 Select the option from the PLC and allow the shutter to close.
5.7.9 After the shutter gets closed, stop the batch and put ‘OFF’ in the run empty button, and put ‘OFF’ in the sterile mode.
5.7.10 When the message with the red background will reflect on the PLC. Select the button and return the support latch.
5.7.11 After completion of the process print the batch record by selecting the option on the PLC.
5.8 Cleaning of depyrogenation tunnel:-
5.8.1 First switch ‘OFF’ the button.
5.8.2 Allow the complete system to cool, when the temperature gets decreased to room temperature start the cleaning process.
5.8.3 Then use the vacuum cleaner to remove the waste material.
5.8.4 Discard the rejected vials in a polybag, tighten them with a cable tie, and paste the status label as per the “status labeling” SOP.
5.8.5 Wipe the conveyor and machine parts with a dry lint-free mop using 70 % IPA.
5.8.6 Finally fix the status label.
6.0 Abbreviations:
PR: Production
QA: Quality Assurance
SOP: Standard Operating Procedure
PLC: Programmable Logic Controler
IPA: Iso Propyl Alcohol
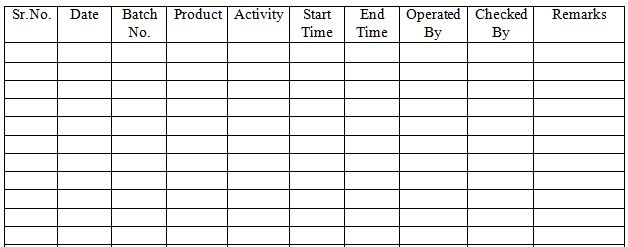
Annexure-I LOG BOOK FOR TUNNEL STERILIZER

Annexure-II for Tunnel sterilizer


Naresh Bhakar is the Founder and Author at Pharmaguddu.com, bringing his extensive expertise in the field of pharmaceuticals to readers worldwide. He has experience in Pharma manufacturing and has worked with top Pharmaceuticals. He has rich knowledge and provides valuable insights and data through his articles and content on Pharmaguddu.com. For further inquiries or collaborations, please don’t hesitate to reach out via email at [email protected].
