GMP & Pharmaceutical Manufacturing Expert
✓ Reviewed by: Pankaj Sharma - Quality Control Specialist
Reviewed for Quality Control accuracy, laboratory practices, analytical methods, and technical relevance
📅 Last Updated: February 17, 2024
Learn about the Standard Operating procedure on RMG including their, Purpose, Scope, Responsibility, Checkpoints, procedure, cleaning, discharging, and Frequency.
1.0 Purpose: To lay down SOP on Rapid Mixture Granulator for Operation and Cleaning.
2.0 Scope: This SOP applies to RMG operation and cleaning In pharmaceuticals.
3.0 Responsibility:
3.1 Operator, Officer Production is responsible for the implementation of this SOP.
3.2 Head Production is responsible for ensuring compliance with this SOP
4.0 Checkpoint :
4.1 Check the cleanliness of RMG before starting the operation. Check that Compressed Air Couplings are correctly fitted.
4.2 Ensure that the primary Compressed Air Pressure is 3 – 6 bar.
4.3 Ensure the Limit Switches (Interlocks) are working correctly.
4.4 Check that the Impeller and Chopper are correctly fitted.
4.5 Check that the Calibration Validity of pressure gauges, hydraulic gauges, RPM indicators, and temperature sensors does not exceed the due date.
4.6 Use a product-dedicated Air Vent Filter Bag.
4.7 Check the integrity of the Fluidized Bed Dryer Bowl Sieve visually before use.
4.8 Check the integrity of the cone mill screen before and after use.
4.9 Ensure the operating panel purging is not more than 0.5 kg/cm2 and chopper air purging and beater air purging pressure are between 0.5 – 1.0 bar.
5.1 Raw Material Discharging:
5.1.1 Place the Fluidized Bed Dryer Bowl below the Discharge port.
5.1.2 Unlock the lid, clamp the lid clamps, and open the top of RMG with the help of the handle provided on the cover.
5.1.3 Unload the Raw Material in the Rapid Mixer Granulator manually.
5.1.4 Close the Lid of RMG and tighten the Clamp.
6.0 Before Cleaning Procedure: Affix the “To Be Clean” Status Label on the Rapid Mixer Granulator if cleaning of RMG is to be performed after the discharging of Wet granules.
6.1 Pre-Cleaning Checks for SOP on Rapid Mixture Granulator:
6.1.1 Put <OFF> the Mains Switch of the Rapid Mixer Granulator.
6.1.2 Cover the Control Panel with a Polybag before starting the Cleanin Remove the “To Be Clean” Status Label from the Rapid Mixer Granulator.
6.1.3 The operator shall visually check the location for cleaning of hard-to-access and hard-to-clean areas in steps to ensure consistency in the cleaning procedure.
6.2 Post-Cleaning Checks :
6.2.1 After the cleaning operator visually checks the location for the clean area.
6.2.2 Close the Discharge Valve opening with a fresh Polybag if, Rapid Mixer Granulator is not used immediately after cleaning.
6.3 Cleaning Procedure for Rapid Mixture Granulator:
6.3.1 Unlock the clamps of RMG to open the lid, then scrape and collect any powder from the Rapid Mixer Granulator, transferring it to a dedicated container labeled as “Non-Recoverable.”
6.3.2 Disconnect the air supply to the spray gun, the silicon tubing, and the spray gun, transferring them wrapped in a polybag to the washroom.
6.3.3 Dedust the Air Vent Filter and clean the peristaltic pump, trolley, and temperature sensor with a dry, lint-free duster soaked in purified water.
6.3.4 Dismantle and clean the spray gun with soft water, passing it through the silicon tubing until visually clean, then rinse with purified water.
6.3.5 Dry the spray gun with a dry, lint-free duster, assemble it to RMG, and dry all tubing by hanging them inverted on a hanger meant for hose pipe storage.
6.3.6 Clean the External Surface of the Rapid Mixer Granulator with a dry, lint-free duster followed by a lint-free duster soaked in purified water.
6.3.7 Clean the control panel with a dry lint-free duster, close the lid, lock the clamps of RMG, and affix the duly filled “Cleaned” Status Label on Rapid Mixer Granulator.
6.3.8 Record the cleaning activities in Equipment Logbook as per SOP “Procedure for making entry in Equipment logbook“.
7.0 Procedure for Calibration of Peristaltic Pump:
7.1 Frequency of Calibration:
7.1.1 Monthly using Digital Tachometer.
7.2 Calibration Procedure:
7.2.1 Set the RPM of the Peristaltic Pump in the PLC from 20 to 220 as specified in Annexure-I.
7.2.2 Start the Peristaltic Pump and record the reading on the Digital Display of the Peristaltic Pump according to Annexure-I.
7.2.3 Apply the Reflecting Mark to the squeezing Roller Bracket of the Peristaltic Pump.
7.2.4 Press the Operation Button and align the visible Photo Signal Light Beam of the digital tachometer with the reflecting mark on the squeezing Roller Bracket.
7.2.5 Start the Peristaltic Pump and set the RPM.
7.2.6 Ensure that the reflecting mark coincides with the photo signal light beam when it passes through the light beam.
7.2.7 Release the Operation button when the reading stabilizes.
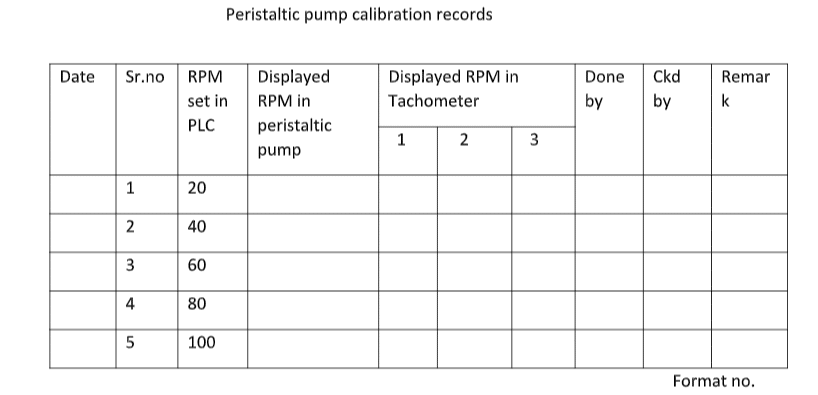
7.2.8 Set the pump’s RPM 20 to 220 at regular intervals of 20 and note down the reading on the Tachometer three times for each set RPM of the Peristaltic Pump.
7.2.9 Note down the reading of each Display RPM on the Tachometer as per Annexure I.
7.2.10 Ensure that the difference between the Display RPM on the Tachometer and the Display RPM on the digital display of the Peristaltic Pump is not more or less than 1 RPM.
8.0 ABBREVIATION:
8.1 Hrs. Hours
8.2 Ltrs. Liters
ANNEXURE for Calibration of Peristaltic Pump:

Naresh Bhakar is the Founder and Author at Pharmaguddu.com, bringing his extensive expertise in the field of pharmaceuticals to readers worldwide. He has experience in Pharma manufacturing and has worked with top Pharmaceuticals. He has rich knowledge and provides valuable insights and data through his articles and content on Pharmaguddu.com. For further inquiries or collaborations, please don’t hesitate to reach out via email at [email protected].