1.0 Objective: 1.1 To lay down the procedure for the Operation and Calibration of Analytical Balance (ISHIDA).
2.0 Scope: 2.1 This SOP is applicable for the operation and calibration of Analytical Balance in Analytical Development labs.
3.0 References: 3.1 In-house
4.0 Responsibility:
4.1 Executive/Officer Analytical Development Shall be responsible for the operation and calibration of the analytical balance.
5.0 Accountability:
5.1 AD Manager: For effective implementation of the SOP.
6.0 Procedure:
6.1 Operating Instructions:
6.1.1 Check the Spirit level of the balance given on the front side of the balance. It should be in the middle position.
6.1.2 Balance warm-up time is 5 minutes for the stabilizing purpose after Power supply is “ON”.
6.1.3 For Switching On, press the “On/Off” key, and for switching off press the “On/Off” key again from the front panel.
6.1.4 After switching ‘On’ the system will initialize and a normal weight display appears.
6.1.5 The weight of any container/butter can be tarred by the “zero/Tare” key and the display set to zero. The tarring range encompasses the entire weighing range of the balance. If you wish to tare a container, place this on the weighing pan. Close shield doors. Then press the → zero/Tare ← key to start the tarring process. After completion of the process, the normal weight is displayed on the screen.
6.1.6 If a container/butter paper is tarred on the balance when it is unstable, the tarring operation will be shown in the blinked display.
6.1.7 After completion of tarring, the zero display appears and balance is ready for operation.
6.1.8 Before Operating the Balance check for proper cleaning, Spirit level, and Daily verification as per the procedure. The above steps shall be performed at the beginning of the day or after any power failure, which leads to the shutdown of the balance for a longer time. Keep the balance always in condition for all the working shifts.
6.1.9 Place the material and record the weight.
6.1.10 After recording the weight, remove the material from pan and tare the weighing balance with the help of → zero/Tare ← key.
6.1.11 Care should be taken not to weigh above the given operating range.
6.1.12 To change the weighing mg to gram Press and hold the →Function ← key till “1 Set 1” icon displays repeatedly press the “Function” key till displays Then change 1 to 2 by using “zero/Tare” key.
6.1.13 For any change then press → zero/Tare ← key and For setting save press → Function ← key and quit from this icon press → Print ← key.
6.2 Cleaning:
6.2.1 Disconnect the balance from power supply.
6.2.2 Clean the external surface of the instrument using a clean lint-free cloth or soft brush.
6.2.3 Only AD analysts shall clean the internal area of the instrument with 70% IPA.
6.3 Handling of Weights:
6.3.1 Ensure that the weights used are calibrated and certified.
6.3.2 Always use forceps to place the weight on the balance pan.
6.3.3 Do not drop the weight with force on the pan of the balance, to avoid any variation in the results.
6.3.4 Weights used for calibration should be always cleaned with a soft brush and wipe
with a clean dry mop before & after each use.
6.4 Daily verification of balance:
6.4.1 Weighing Note:
6.4.1.1 During operation all the sliding doors of balance shall be properly closed.
6.4.1.2 Balance pan and surrounding shall be cleaned on pre and post weighting.
6.4.2 For Solid:
6.4.2.1 Take the Square pan size butter paper and keep it in the middle of the balance pan and tare the paper.
6.4.2.2 Take the required amount of sample to be weighed and close all the sliding doors of balance and take print as gross weight.
6.4.2.3 Carefully transfer the material to glassware/pots without strucking the paper and put the butter paper on pan and take weight.
6.4.2.4 Subtract the tare weight from the gross weight and get the net weight of the material.
6.4.3 For Liquid:
6.4.3.1 Put the container with having dry and clean bottom pan and tare the container. (Ensure that container weight is not more than 50% of the maximum weighing capacity of balance).
6.4.3.2 Take the required amount of sample in a container to be weighed and close all the sliding doors of balance and take print as net weight and remove the container.
Related: Daily Verification of Balance
6.5 Verification:
6.5.1 Check the spirit level, if not leveled adjusts the level with the help of spirit level indicator and use leveling screw situated at the base of the instrument.
6.5.2 Perform internal calibration by pressing the relative key.
6.5.3 Minimum weight for verification range shall be 2000 × standard deviation of uncertainty measurement.
Note: In the pharma industry, the general chapters (GC) <41> and <1251> of the USP are widely recognized as standards for managing balances, and how a minimum weight is calculated is also stipulated in these chapters.
According to the general chapters <41> “Balances”, a balance used for samples that necessitate accurate weighing must be
calibrated over the operating range and meet requirements defined for repeatability and accuracy
6.5.4 In case of working range, maximum range shall be about 80% of the balance capacity.
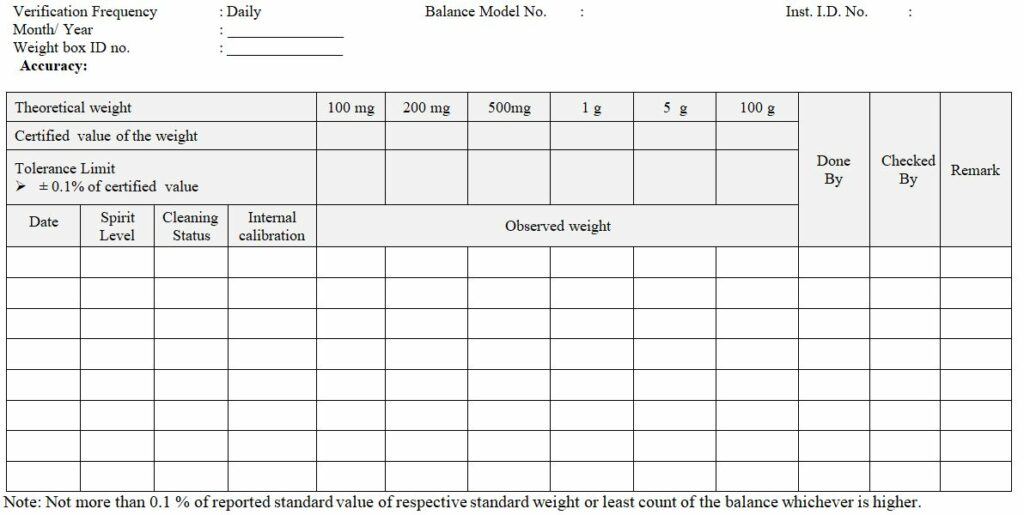
6.5.5 Place the standard weight one by one in the center of the platform of the balance and record the observation in “Balance Verification Record” refer to Annexure-II.
6.5.6 If balance is moved from one place to another place, calibration shall be performed & verify the balance prior to use
6.5.7 If observations are out of tolerance limit, affix the “Under maintenance” label along with sign, and date and discontinue the use of the balance.
6.5.8 Inform engineering department or service engineer of corrective action.
6.5.9 Acceptance Criteria: Should be not more than 0.1% of reported standard value of respective standard weight or least of the balance whichever is higher.
6.6 Calibration (Monthly): Frequency ± 3 days
6.6.1 Following parameters shall be performed while performing calibration
• Accuracy
• Linearity Test
• Uncertainty Measurement
• Eccentricity Test
6.6.2 Accuracy:
6.6.2.1 Check the accuracy of the balance using standard weight mentioned against the capacity of the balance.
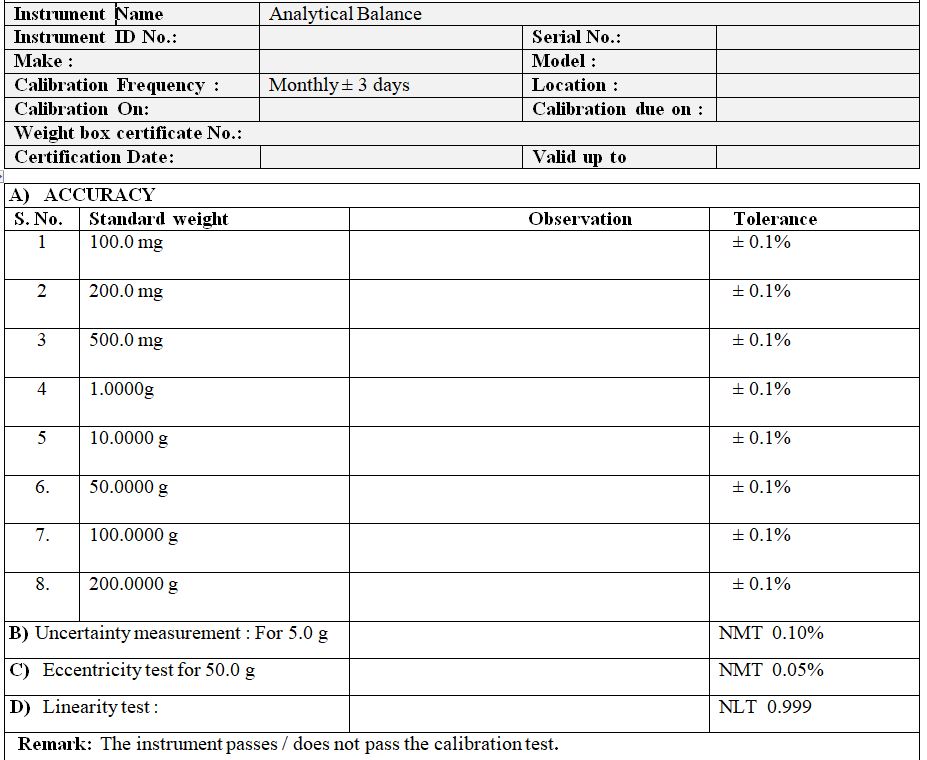
6.6.2.2 Place the standard weights one by one in the center of the platform of the balance and record the observation in the balance calibration record as per Annexure III.
6.6.2.3 Acceptance Criteria: Should be not more than 0.1% of repeated standard value of respective standard weight or least of the balance whichever is higher.
6.6.3 Linearity test:
6.6.3.1 Linearity refers to the ability to deliver identical sensitivity throughout the weighing capacity of a balance.
6.6.3.2 Put the following weight in the center of the weighing pan of balance as 100 mg, 500 mg, 1g, 5g, 50g, and 200g, and record the observation of each weight.
6.6.3.3 Plot a graph of actual weight against observed weight.
6.6.3.4 Acceptance Criteria: The correlation coefficient should not be less than 0.999.
6.6.4 Uncertainty measurement:
6.6.4.1 Perform uncertainty measurement on 5.0g.
6.6.4.2 Weigh selected standard weight 10 times and record the observation in annexure-II
6.6.4.3 Calculate mean and standard deviation from the above data.
6.6.4.4 Calculate uncertainty for all the selected weights by using the following formula:

6.6.4.5 Acceptance criteria: Uncertainty is satisfaction if 2 × standard deviation divided by the actual mass value, does not exceed 0.10%
6.6.4.6 If the standard deviation obtained is less than 0.41d, where‘d’ is the scale interval, replace this standard deviation with 0.41d. In this case, uncertainty is satisfaction if 2 × 0.41d, divided by the actual mass value, does not exceed 0.10%
6.6.5 Eccentricity test:

6.6.5.1 Eccentricity usually is expressed as the largest magnitude of any of the deviations between off centers reading for the least load.
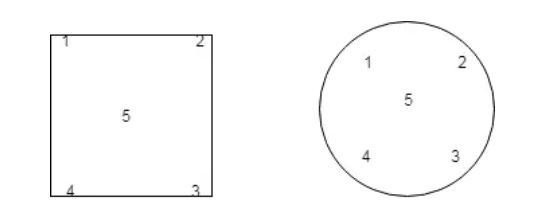
6.6.5.2 Place standard selected weight (50.0g) centrally on the pan and note down the result =R(1)
Place standard at points 2, 3, 4, 5 and note down the result = R (2) …….R (5)
6.6.5.3 Calculation:
Subtract value R (1) from following R (2)……. R (5)
The maximum deviation of calculated difference is maximum differential centricity error.
Example of centricity error differential calculation.
Formula E= R (i) – R (1) with E= eccentricity differential error
R (i) = following point indication
R (1) = central location indication.
R (1) = 50.0003 g
R (2) = 50.0001 g
R (3) = 50.0004 g
R (4) = 50.0007 g
R (5) = 50.0003 g
E (2) = 50.0001-50.0003 = -0.0002
E (3) = 50.0004-50.0003 = 0.0001
E (4) = 50.0007 –50.0003 = 0.0004
E (5) = 50.0002-50.0003 = -0.0001

In this case, maximum differential eccentricity error is equal to approx. 0.0008 g.
6.6.5.4 Acceptance criteria: NMT 0.05 %
6.6.5.5 Place the weight (30% of balance capacity or possible integer up to 30% of balance capacity as mentioned in the balance calibration record).
6.6.5.6 If all the parameters fall within acceptance limit, affix the calibration status label.
6.6.5.7 If any observation is out of limit, affix the “under maintenance” tag and discontinue use of balance.
6.6.5.8 Inform service engineer or maintenance department of corrective action.
6.6.5.9 After corrective action if balance is in working condition, recalibrate the balance prior to starting the activity.
6.6.5.10 No repairs shall be done by another person except a qualified maintenance person or service engineer.
7.0 Abbreviations
SOP: Standard Operating Procedure
No. : Number
Dept. : Department
AD: Analytical Development
% : Percent
SD: Standard Deviation
g: Gram
LCD: Liquid Crystal Display
mg: Milligram
Min. : Minimum
Max. : Maximum
IHS: In-house specification
8.0 Annexures:
8.1 Annexure I: Analytical Balance Logbook.
8.2 Annexure II: Daily Verification Record of Analytical Balance.
8.3 Annexure III: Calibration Record of Analytical Balance.
Annexure Will be provided shortly
Annexure I: Analytical Balance Logbook.

Annexure II: Daily Verification Record of Analytical Balance.

Annexure III: Calibration Record of Analytical Balance.


Panks Pamyal is a Author and Editor at Pharmaguddu.com. He Worked in Top Pharmaceuticals MNCs in India had a more then 10 years experience in Quality control department. He Delivering most valuable insights and knowledge through this website.
