GMP & Pharmaceutical Manufacturing Expert
✓ Reviewed by: Pankaj Sharma - Quality Control Specialist
Reviewed for Quality Control accuracy, laboratory practices, analytical methods, and technical relevance
📅 Last Updated: February 16, 2024
Vernier caliper is used widely in pharmaceutical and other industries for Accurate Measurement of any products and part of the equipment is essential to know the actual dimension. So to measure the dimension first you have to know about, the vernier caliper Definition, procedure, parts, operation, cleaning, error solutions, and purpose.
Vernier Caliper Definition: The Dial Vernier Caliper is a precision instrument that can accurately measure internal and external dimensions.
Procedure for Dail Vernier Caliper
Instrument Specification:
- Instrument ID No.: As on individual Dial Vernier Caliper.
- Measurement Range: As per the measuring range of the major scale.
- Least Count: 0.02 mm, 0.01mm
- Operating Temperature: 5°C to 40°C
- Storage Temperature: -10°C to 60°C
Dial Vernier Caliper parts:
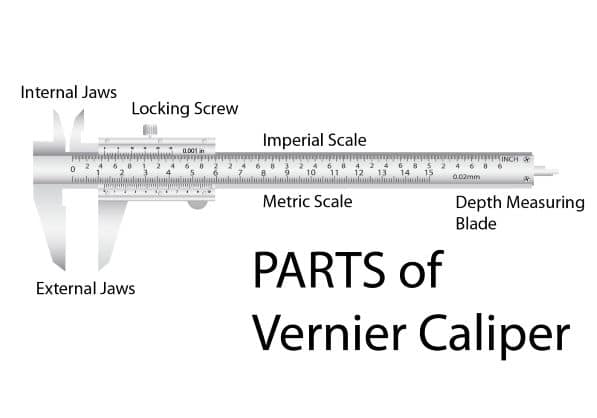
- Outside Measuring Faces: Used to measure the external dimensions of an object.
- Step Measuring Faces: Face to be used for Measurement of step dimensions.
- Inside measuring faces: Faces are used to measure internal dimensions.
- Clamp Screw (Locking Screw): A device to lock the slider in its exact position allowing correct readings to be taken without altering the distance between the two measuring faces, thus retaining perfect alignment.
- Depth bar: Used to measure the depth dimensions of an object.
- Main scale: The major scale shows the limit of Measurement of the Dial Vernier Caliper up to which it can measure. It shows Measurements in both inches and mm.
- Slider: is used to take Measurements of any dimensions. It is required to move.
- Dial graduation:
- Bezel clamp screw:
- Thumb roller:
Cleaning of vernier:
- Clean the external surface with the help of a lint-free dry cloth.
- Wipe off dust, cutting chips, and moisture from the instrument after use.
- Clean the surface in-between measuring faces and then put them into a box.
Operation of Digital Vernier Caliper:
Keep the Dial Vernier Caliper at stable room temperature before starting the measuring process.
Outer (External) Dimensional Measurements:
- Outside measuring faces shall be used for the Measurement of outside dimensions.
- Move the slider to allow sufficient space between measuring faces to accommodate the object to be measured.
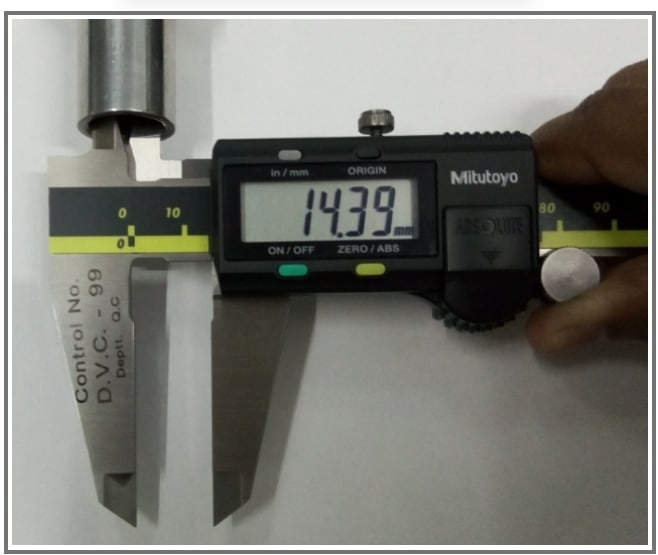
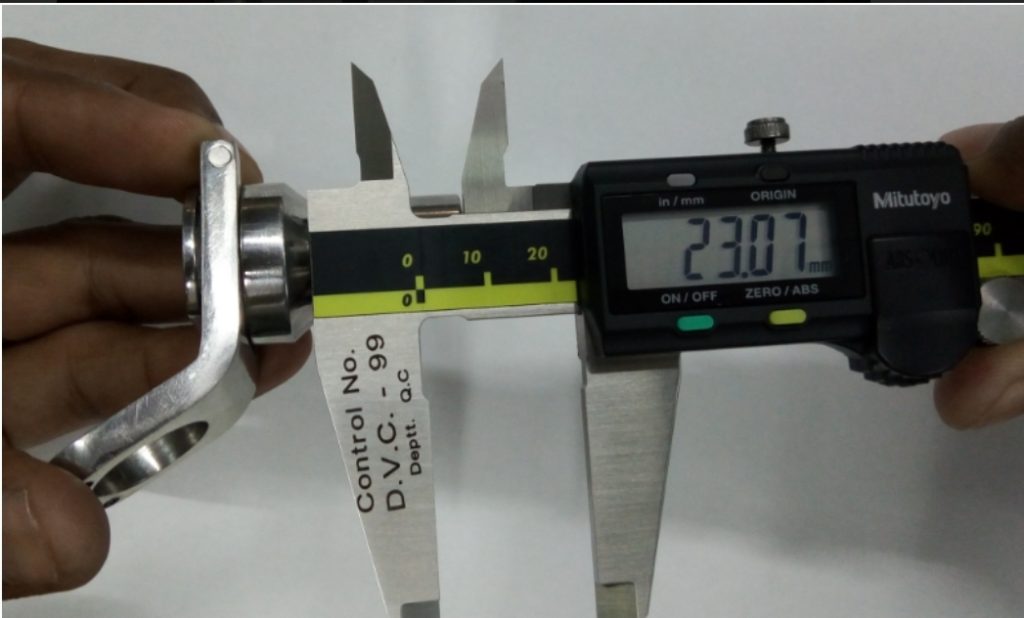
Measurement of the diameter of the gasket using a digital caliper:
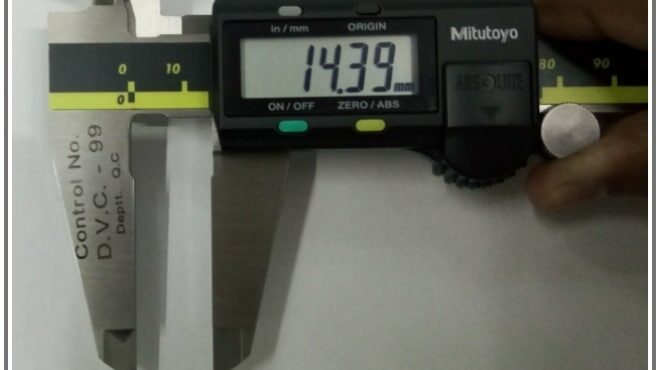
- Hold the thing in the correct (√) way for Measurement, as shown in Figure.
- Move the slider to allow until the jaw meets the object.
- Check that both faces are touching the object evenly.
- Tighten the locking screw to hold reading when you have to remove the caliper before reading notes down.
- Remove the object from the Dial Vernier Caliper.
- Read off the reading from the main scale to obtain a reading to the nearest millimeter.
- Read off the reading from the Dial graduation.
- Add both readings obtained from points no. 6 and 7 to bring the total reading of the Measurement.
- Reset the locking screw (Slider clamp screw) to unlock the position if the locking screw tightens.
Internal Dimensional Measurements:

- Inner dimensions shall be measured by the upper jaw of the Vernier caliper.
- Insert upper jaws into the object cavity and move the slider to allow touching to the inner surface of the object to be measured.
- Hold the object in the correct (√) way for Measurement, as shown in Figure.
- Check that both faces are touching the object evenly.
- Tighten the locking screw to hold reading when you have to remove the caliper before reading notes down.
- Read off the reading from the main scale to obtain a reading to the nearest millimeter.
- Read off the reading from the Dial graduation.
- Add both readings obtained from points no. 6 and 7 to bring the total reading of the Measurement.
- Reset the locking screw to the unlock position if the locking screw tightens.
Vernier Caliper Depth Measurements:
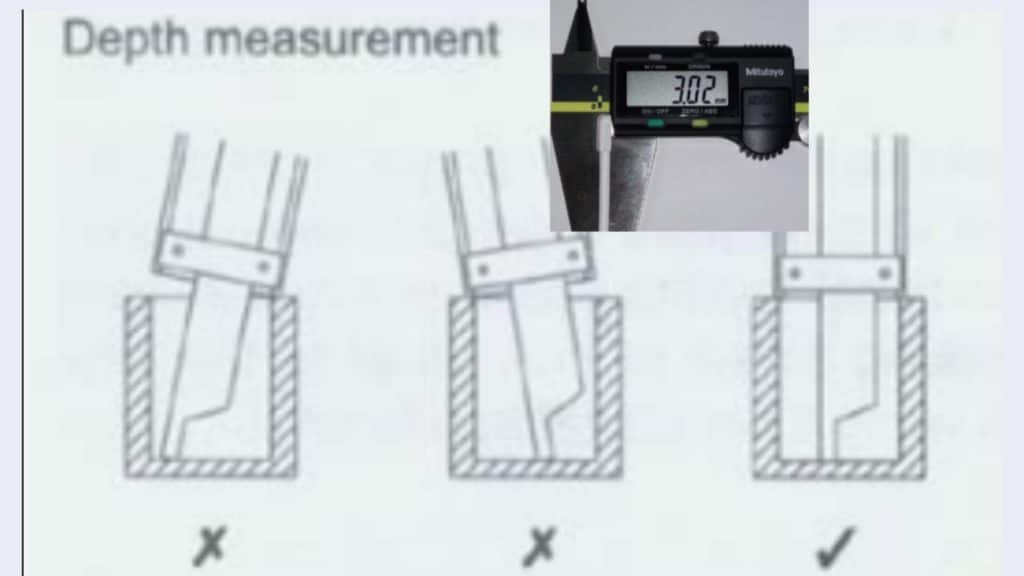
- Depth measurement shall be done by the depth bar of the Vernier caliper.
- Insert depth bar into object cavity up to depth or point of Measurement or as per the requirement of measurements.
- Hold the Dial Vernier Caliper in a vertical position as shown in Figure for measurements.
- Tighten the locking screw to hold reading when you have to remove the caliper before reading notes down.
- Remove the Dial Vernier Caliper from the object.
- Read off the reading from the main scale to obtain a reading to the nearest millimeter.
- Read off the reading from the Dial graduation.
- Add both readings obtained from points no. 6 and 7 to obtain the total reading of measurements.
- Reset the locking screw to the unlock position if the locking screw tightens.
Vernier Caliper Step Measurements Procedure:
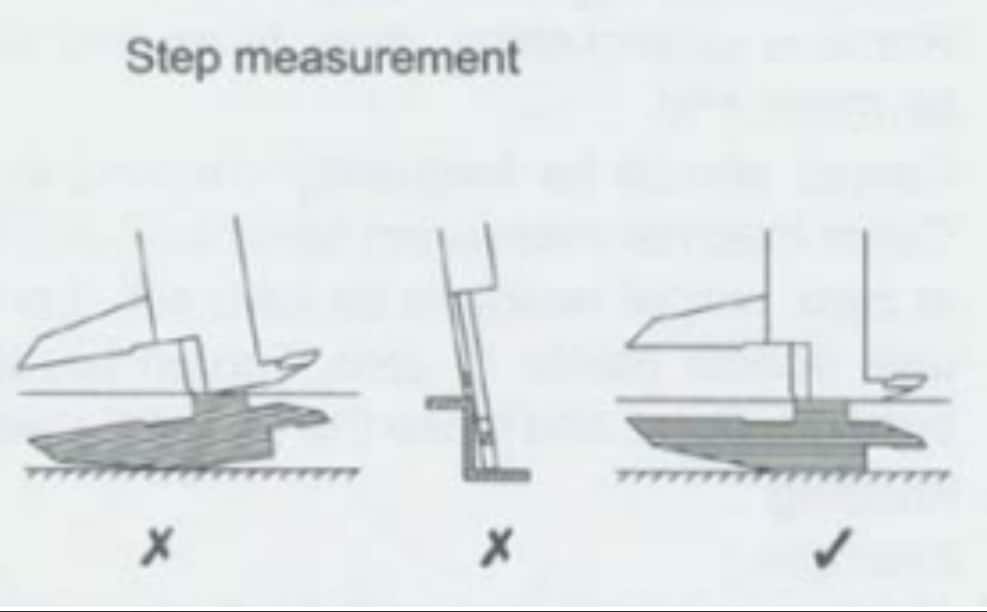
- Step-measuring faces shall be used for the Measurement of steps in objects.
- Keep the Dial Vernier Caliper on the start point of the object and move the slider up to the end. Ensure the faces of both jaws are touching the step surface; if not, it shall be in touch to get an accurate reading.
- Hold the Dial Vernier Caliper in a vertical position as shown in Figure for measurements.
- Tighten the locking screw to hold reading when you have to remove the caliper before reading the note down.
- Remove the Dial Vernier Caliper from the object.
- Read off the reading from the main scale to obtain a reading to the nearest millimeter.
- Read off the reading from the Vernier scale parallel with the reference line of the major scale.
- Add both readings obtained from points no. 6 and 7 to get the total reading of measurements.
- Reading can be read in mm or inches as per the requirement of Measurement.
- Reset the locking screw to the unlock position if the locking screw tightens.
Related: Tablets friability apparatus
Battery Installation and Origin (Zero points) setting:
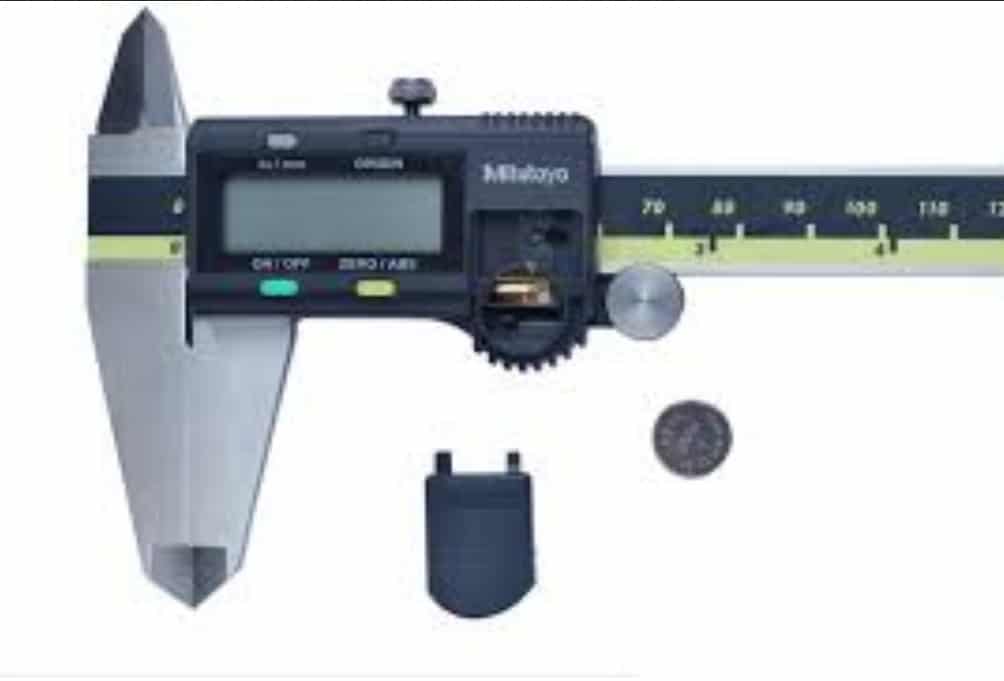
Battery Installation:
- Remove the compartment lid and install the SR 44 battery (Silver Oxide cell) with its positive side facing up as in the figure.
- Set up the origin of the caliper after installing the battery.
- Upon installation of the battery, the “…….” indicator will blink on the display. Then perform the origin setting.
- Reinstall the battery if the “…….” indicator does not blink.
- Be sure not to damage the battery terminal when installing the battery.
Origin Setting:
- Upon installation of the battery, the “…….” indicator will blink on display. Close the jaws and hold down the ORIGIN switch for more than one second.
- The “0.00” display (mm model) or the “0.0000” display (inch model) appears, indicating the origin (zero pints) setting is complete.
- When the battery is set, first press the ORIGIN switch and do not move the slider (on the reverse side) until the original value is fixed. It may result in incorrect counting.
Vernier Caliper Error Symptoms and Remedies:
“E” at the least significant digit:
- It appears that the scale surface is too contaminated to count. Wipe off the scale cover surface.
- Reinstall the battery when the “E” indicator stays on after the scale cover surface is wiped off. If the “E” indicator persists after reinstalling the batteries, remove the batteries and report to the maintenance department.
B” indicator:
- Appears when the battery voltage is low. Immediately replace the batteries.
Same numbers for all five digits or flashing “H”:
- Remove the battery once and set it again.
Other errors:
- If the error in the Figure left appears, reset the origin point.
Calibration of vernier caliper:
- Calibration frequency: Yearly
- Calibration of the Dial Vernier Caliper shall be done from External NABL Approved Laboratory.
Related: Tablets Hardness Tester
Maintenance:
- Inspect the Dial Vernier Caliper for any signs of damage, such as indications that might have dropped.
- Check that measuring faces are flat, and free from scratches, dents, and chipped edges.
- Move the slider through its entire range to check that it moves smoothly.
- Clean the scale properly and lubricate it with a small amount of clock oil.
Precautions:
- Before use, make sure measuring faces are clean.
- To get an accurate reading, make sure the object to be measured must be free from cutting chips, dust, burrs, and other foreign substances.
- Do not over-tighten the Dial Vernier Caliper as this can lead to the deformation of both measuring faces and the measured object.
- Make sure that the ZERO lines of the Vernier scale coincide with the zero lines of the major scale when external jaws are closed.
- Make sure that no slit is observed between the two external jaws when they are closed.
- The Dial Vernier Caliper is a highly heat-sensitive instrument and should be stored at room temperature.
- The object to be measured should also be kept at room temperature since this may also affect the reading.
- Store the Dial Vernier Caliper in its appropriate storage compartment to prevent any wearing.
- Measure the desired object several times to ensure that the reading obtained is accurate.
- Do not drop or strike the Vernier Caliper.
Reference:
Supplier Manual
Requirements of ISO 13485:2016, MDD 93/42/EEC, and IMDR 2017

Naresh Bhakar is the Founder and Author at Pharmaguddu.com, bringing his extensive expertise in the field of pharmaceuticals to readers worldwide. He has experience in Pharma manufacturing and has worked with top Pharmaceuticals. He has rich knowledge and provides valuable insights and data through his articles and content on Pharmaguddu.com. For further inquiries or collaborations, please don’t hesitate to reach out via email at [email protected].