Quality Control Specialist | Industry Experience
✓ Reviewed by: Pankaj Sharma - Quality Control Specialist
Reviewed for Quality Control accuracy, laboratory practices, analytical methods, and technical relevance
📅 Last Updated: July 24, 2026
Quick Answer
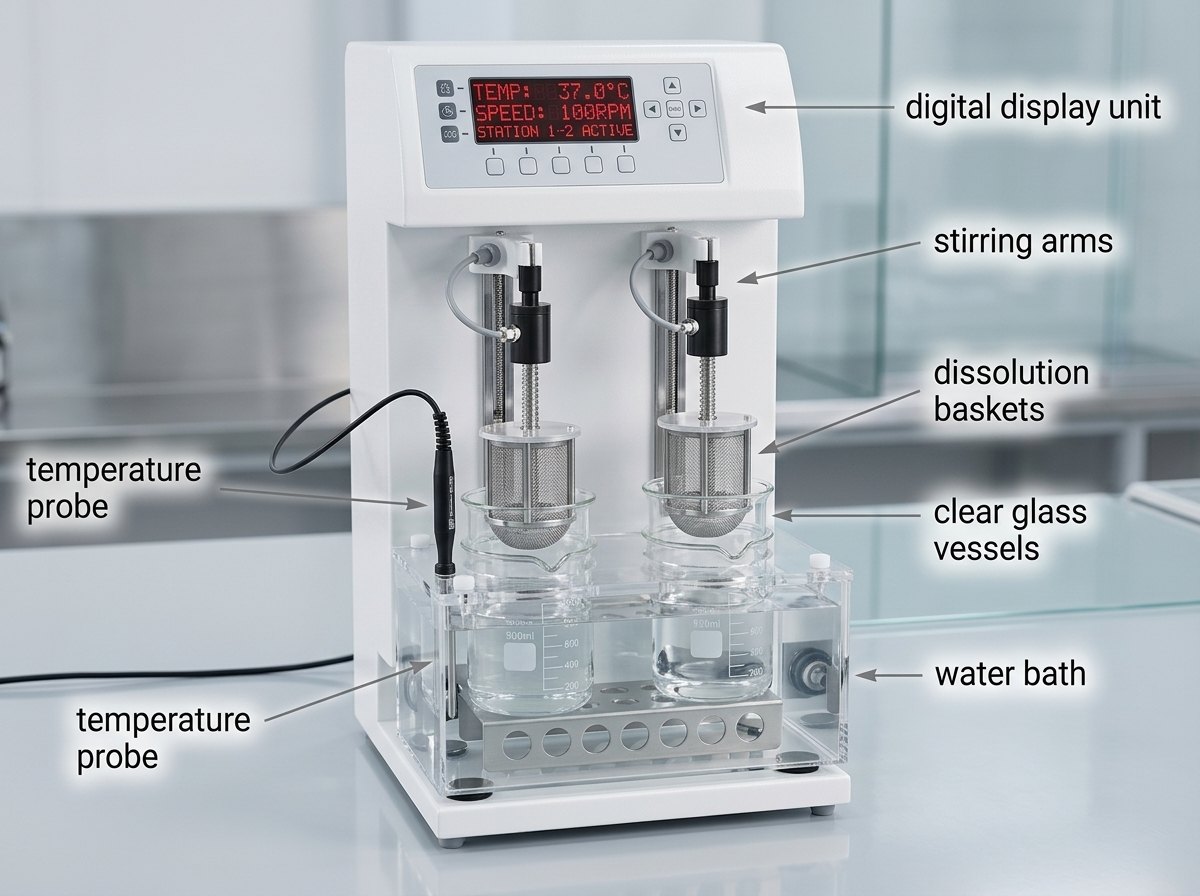
A disintegration test apparatus is a pharmacopoeial instrument used to check how fast a tablet or capsule breaks down into smaller particles when placed in a fluid at body temperature. It works by moving a basket-rack assembly holding six dosage units up and down through a test medium at a fixed rate — usually 29 to 32 cycles per minute, at 37°C ± 2°C. If no particle residue remains on the mesh (except fragments of coating or capsule shell), the disintegration time passes. This test is a core quality control check in pharmaceutical manufacturing, used for immediate-release, delayed-release, and dispersible tablets, as well as hard and soft gelatin capsules, before batch release.

Disintegration Test Working Principle
Disintegration is defined as that state in which no residue of the tablet and capsule remains on the screen of the apparatus or, if a residue remains, it may consist of a fragment of insoluble coating of the tablet or capsule shells or is a soft mass with no palpable core.
If Discs have been used with capsules, any residue remaining on the lower surface of discs only consists of fragments of their shells.
Types of Disintegration Test Apparatus
Disintegration test apparatus are mainly of two types, Type A and Type B:
Type A: It consists of 6 tube assembly mainly used for tablets of size less than 80 mm in length.
Type B: It consists of a 3-tube assembly used for tablets of size more than 80 mm in length.
Disintegration Test apparatus assembly
DT apparatus assembly Consists of the following parts:
- Rigid Baskets
- Tube
- Glass Tubes
- Plates
- Cylindrical Disks
- Water Bath Assembly
- Basket-Rack Assembly
- Mesh Screen
- Thermostat
1. Rigid Baskets:
The rack assembly supports six cylindrical glass tubes, 77.5 ± 2.5 mm long, 21.5 mm in internal diameter, and a wall thickness of about 2 mm.
2. Tube:
The tube is held vertically by two superimposed, transparent plastic plates, 90 mm in diameter and 6 mm thick, perforated by six holes having the same diameters as tubes.
The hole is equidistant from the center of the plate and is equally spaced from one another, that is attached to the lower side of the lower plate is a piece of woven gauze made from stainless steel wire (10 mesh screen size). These are 635 mm in diameter and have a nominal mesh aperture of 2.00 mm.
The upper plate is secured with a tempered stainless steel circle punctured by six gaps, each around 22 mm in breadth, accommodating our cylinders and holding them between the plastic plates. The holes coincide with those of the upper plastic plate and the upper open ends of glass tubes.
3. Glass Tubes (6 Tubes)
Purpose: Individually hold one tablet or capsule per tube.
Function: Open at the top and fitted with a mesh screen at the bottom, allowing fluid to pass while retaining larger fragments.
Operating Role: Each tube is roughly 77.5 mm long with an internal diameter of about 21.5 mm, per USP specifications.
Common Issues: Cracked or chipped glass, especially at the rim, which can affect fluid flow and disc movement.
4. Plates:
Plates are firmly held in place and are 77.5 mm apart by vertical metal rods on the sides. The center of the upper plate is fixed to the metal rod, allowing the assembly to be connected to a mechanical device capable of quickly raising and lowering it at a constant frequency of between 29 and 32 cycles per minute over a distance of 50 to 60 mm.
The design of the basket-rack assembly may be somewhat different provided specifications for the glass tubes, and the screen mesh sizes are unchanged.
Related: pH Meter | Principle, Calibration, and Working
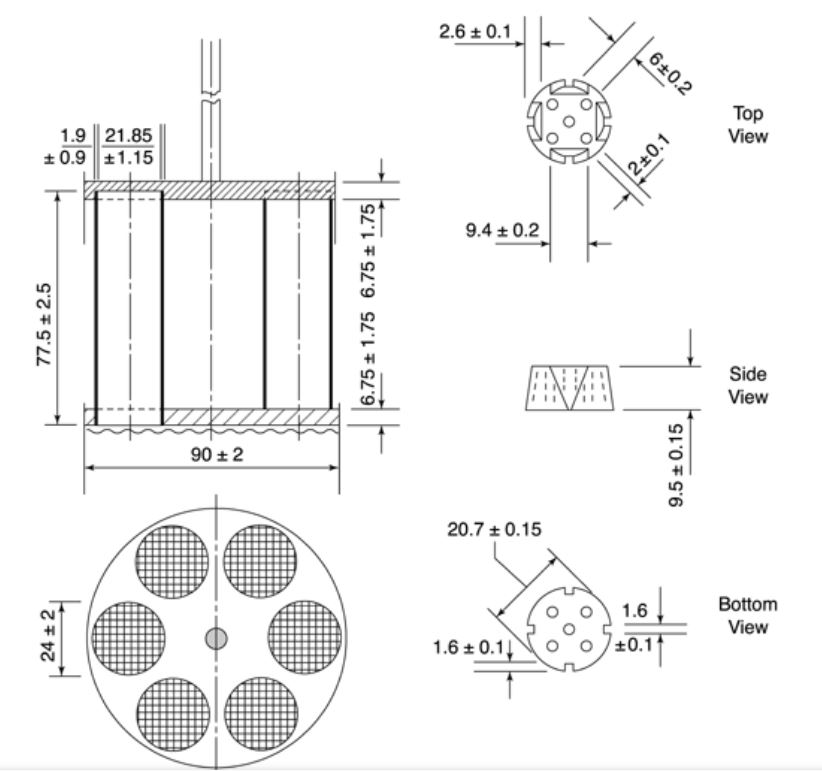
5. Cylindrical Disks:
The holes in the disk have dimensions of 20.7 ± 0.15 mm and a thickness of 9.5 ± 0.15 mm. The disk is made of transparent plastic with a density ranging from 1.18 to 1.20. It has five holes, each 2 mm in diameter. One hole is at the center, and the other four are equally spaced in a circle with a radius of 6 mm from the center of the disc. Additionally, four grooves are cut on the horizontal surface of the circle. These grooves are 9.5 mm wide and 2.55 mm deep on the upper surface of the plate, and 1.6 mm square on the lower surface.
Common Issues: Worn or damaged discs, incorrect disc use for dosage forms that don’t require them, which can affect results.
6. Water Bath Assembly:
In a suitable container, preferably a 1000 ml beaker, the assembly is placed in the liquid. The wire mesh should be at least 25 millimeters below the liquid surface, and its lower end should be at least 25 millimeters above the beaker.
Operating Role: Maintains 37°C ± 2°C throughout the test duration.
Common Issues: Temperature drift due to a faulty thermostat, inconsistent heating if the water level is too low.
7. Basket-Rack Assembly
Purpose: Holds the six tubes that contain the dosage units during the test.
Function: Provides a fixed, uniform structure so all six units experience the same motion and exposure at the same time.
Operating Role: Moves vertically with the drive mechanism, transferring the reciprocating motion to each tube.
Common Issues: Corrosion or pitting on stainless steel or glass tubes over time, misalignment causing uneven agitation across tubes.
8. Mesh Screen
Description: It is a woven stainless steel wire cloth (plain square weave, 1.8-2.2 mm opening or 0.57-0.66 mm wire diameter, nominal 2 mm opening; USP No 10 mesh) mounted on the lower side of the lower plate of the basket-rack assembly. The 10-mesh screen is used for all six tubes of the apparatus; there is only one such screen for all stations, not six screens.
Operation: It is the physical end-point for the test. The test should be ended when no residue is visible on the mesh or after gentle rubbing no hard core is detectable (some free particles of coating or excipient are allowed).
Potential Problems: May be clogged with excipient; may stretch or tear during use, resulting in erroneously passing coarse material. Note that such a problem would affect all six stations, not just one, because there is only one screen, not six separate ones.
9. Thermostat:
A Thermostat is an Arrangement for heating the liquid and maintaining the temperature around 37 ± 2° C.
Key Operating Parameters
- Temperature: 37°C ± 2°C
- Cycle Rate (Frequency): 29 to 32 cycles per minute
- Stroke Length: Approximately 55 mm ± 2 mm
- Immersion Depth: Tubes should not touch the bottom of the vessel; fluid should cover the tablet at the lowest point and screen should clear the surface at the highest point, per monograph
- Number of Dosage Units per Run: 6 (with provision to test 12 more if 1–2 fail)
- Test Medium: Water, unless otherwise specified (e.g., 0.1N HCl for acid stage of enteric-coated tablets, followed by pH 6.8 phosphate buffer)
- Mesh Size: 10-mesh screen (USP specification)
Related Post: Common Problems and Troubleshooting for Disintegration Test Apparatus
Disintegration Test Procedure/ Step-by-Step Process Flow
Thinking about how to perform the Disintegration test? Let under their methods and different stages:
- Prepare test medium (usually water or other liquid as specified in the monograph) and fill the vessel to the required volume.
- Turn on the apparatus and allow the bath to equilibrate at 37°C +/- 2°C.
- Place one dosage unit (tablet or capsule) in each of the six tubes of the basket-rack assembly.
- Place discs on the top of the tablets if required by the monograph for the specific dosage form.
- Lower the basket-rack assembly into the fluid to the specified immersion depth.
- Turn on the apparatus and the timer at the same time.
- Raise and lower the basket at the prescribed rate (typically 29-32 cycles per minute).
- Watch the six tubes during the procedure or wait for the signal from the apparatus (modern equipment is often equipped with a built-in sensor that signals when the last tablet has completely disintegrated).
- Mark the time on the timer when each tablet or capsule has totally disintegrated (no visible part of the dosage unit except for allowed fragments).
- If one or two units failed to meet the requirements of total disintegration, repeat testing for 12 additional units according to the USP requirements and consider results for 12 units (not less than 16, of a total of 18 tablets/capsules) for acceptance criteria.
- Record all relevant information such as instrument number, bath temperature, rotation rate, and disintegration time in the QC record or laboratory information management system (LIMS).
- Rinse and clean tubes, meshes, and discs and dry them for the next use.
L1, L21 and L3 stage to perform:
| Stage | Stage + No. of Tablets | Pass/ Fail Criteria |
|---|---|---|
| L1 | L1 —6 | All Tablets/ Capsules shall be Disintegrates |
| L2+L3 | L1+L2+ L3 — 18 | Not less than 16, of a total of 18 tablets/capsules |
If the tablets or capsules adhere to the disc and the examined preparation fails to comply, repeat the test omitting the disc. The preparation complies with the test if all the tablets or capsules disintegrate in a repeat test.
Calibration of Disintegration Test Apparatus
- Start the machine and count how many times it operates in a minute.
- Check the distance traveled by the mechanical device holding the cells and discs. Use vernier calipers to measure the distance. Make sure the device moves smoothly covering a distance of 50 to 60 mm consistently.
- Record the number of cycles per minute using a calibrated stopwatch.
- Set the required temperature, turn on the heater of the machine, and maintain a stable temperature.
- Examine the water bath temperature with a calibrated thermometer.
- Set the timer for 30 minutes, and start the machine and the calibrated stopwatch together. Note the stopwatch reading as soon as the machine stops.
- Visually inspect the integrity of the sieve attached to the baskets.
- Attach a calibration status label, filled and signed, on the equipment after completing the calibration.
- If you notice any issues, inform the Head of the department and the engineering department about the necessary actions. Place an ‘UNDER MAINTENANCE’ tag on the machine.
- Recalibrate the machine after fixing any issues.
Frequency: once a month.
Related: Various Types of HPLC Columns
Disintegration time for various types of Tablets and capsules:
| Tablets Types/ Capsules Type | Disintegration Time |
| Uncoated tablets | 15 min (BP, IP), 30 min (USP) |
| Film-coated | 30 min (BP), others coated tablets 60 min |
| Sugar-coated | 60 min (BP) |
| Effervescent tablets | <5 min (BP, IP) |
| Dispersible tablets | <3 min (BP, IP) |
| Enteric-coated tablets | With 0.1 N HCl- No disintegration in 120 min With 6.8 pH phosphate buffer in 60 min |
| Hard gelatin Capsules | 30 min as per BP, and USP |
| Soft gelatin Capsules | 30 min as per BP |
Disintegration Apparatus Applications:
- Pharmaceutical manufacturing (for release testing of tablets and capsules)
- Pharma R&D (formulation development and stability)
- Quality control laboratories (in-process control and release testing)
- Contract manufacturing organizations (CMOs)
- For regulatory submission testing (stability and comparative dissolution/disintegration)
- Pharmacy education and training institutes
Disintegration Apparatus Benefits:
- Simple, rapid, and reproducible test for the control of dosage form breakup.
- Provide an early warning of potential dissolution or formulation problems before undertaking time-consuming dissolution procedures.
- A simple and inexpensive alternative to dissolution testing, particularly for screening purposes.
- A harmonized, established method that is recognized in the United States Pharmacopeia (USP), British Pharmacopoeia (BP), Indian Pharmacopoeia (IP), and Ph. Eur
- It helps to ensure the quality of tablets and capsules and the consistency of dosage forms from batch to batch.
- It helps to ensure that tablets and capsules meet regulatory requirements.
Disintegration Apparatus Limitations:
- Disintegration testing alone cannot ensure adequate drug dissolution or bioavailability.
- Disintegration testing does not evaluate the rate or extent of drug release into solution.
- The end point of disintegration testing often requires visual assessment by the analyst, which may introduce human error, particularly with manual apparatus.
- Disintegration testing can give misleading pass/fail results due to mesh clogging or inappropriate use of the disintegration discs.
- Routine calibration of the equipment is necessary to ensure compliance, which may be time-consuming and add to laboratory workload.
- Disintegration testing should not be used as the sole criterion for assessing the quality of modified-release or extended-release dosage forms; dissolution testing is more appropriate for these types of products.
Industry Standards and Regulatory Requirements for DT Apparatus:
Disintegration testing refers to USP <701> Disintegration, BP Appendix XII A, IP Appendix and Ph. Eur. 2.9.1 Disintegration of Tablets and Capsules. Despite some variations in wording, these pharmacopoeial methods describe the same test procedure. The main differences can be found in requirements for tablets and capsules, namely, the use of appropriate dissolution media. Still, the apparatus design, cycle rate and temperature during testing are mostly similar.
According to the USP, disintegration of uncoated tablets should occur within 15 minutes, unless otherwise specified in individual monographs. For enteric-coated tablets, the test includes an initial step of placing them in a shaking water bath or a medium of 0.1N HCl for a definite period of time with no disintegration or cracking allowed. Afterwards, the coated tablets are transferred into a buffer solution for further testing.
The same requirements as for tablets are applied to capsules, with the exception of gelatin coats. According to GMP, the apparatus should be validated according to IQ/OQ/PQ protocols. Additionally, routine checks should be performed in accordance with a written procedure and a master schedule, which describes the acceptance criteria for temperature, cycle rate and timer accuracy. These protocols should be compliant with 21 CFR 211.160 and corresponding EU GMP Annex on laboratory control.
Related post: List of Quality Control Equipment in Pharmaceuticals
FAQs
Answer: State at which no residues remain of tablets on-screen of apparatus, besides fragments of coated tablets.
Answer: 55 mm ± 2 strokes/minute.
Answer: Disintegration time is the time required to break the unit dosages into small granules under specified conditions.
Answer: The disk is used to allow the tablets to stay deep in the water during the entire process.
Answer: Most commonly, it should disintegrate within 15 minutes according to the USP (United States Pharmacopeia). However, each dosage form individually indicates particular conditions and requirements. Hence, you should refer to the specific monograph.
Answer: Six tablets or capsules should be tested for disintegration, with each portion of the tested units placed in a separate tube of a basket-rack device. If one or two preparations fail to meet the requirements, you should perform an additional test with twelve units and apply the appropriate acceptance criteria.
Answer: The temperature should be 37 degrees Celsius, as it represents a normal body temperature. With that in mind, you can use a reference thermometer to check whether the bath is appropriate for conducting tests.
Answer: According to the USP, the mesh size at the bottom of each tube should be 10. It is crucial to follow this requirement, as it defines the point when the tested preparation either disintegrates or fails.
Answer: Two stages help determine whether the dosage form resists the conditions found in the stomach and disintegrates in the intestine. Hence, you should use a tumbler and acid solution for the first stage and a buffer for the second stage.
Answer: Generally, most disintegration test apparatus operate from 29 to 32 cycles per minute. The cycle rate is essential, as the motor or a drive cam may deliver an incorrect rate if it is not set appropriately.
Answer: It depends on the requirements outlined in the monograph, which state general recommendations for testing both hard and soft gelatin capsules. In some cases, you should place them on a disc at the bottom of the tube, while in others, you should not.
References:
- United States Pharmacopeia (USP) <701> Disintegration
- British Pharmacopoeia (BP), Appendix XII A, Disintegration Test
- Indian Pharmacopoeia (IP), Disintegration Test Apparatus specifications
- European Pharmacopoeia (Ph. Eur.) 2.9.1, Disintegration of Tablets and Capsules
- US FDA, 21 CFR 211.160, Laboratory Controls
- ICH Q6A, Specifications: Test Procedures and Acceptance Criteria for New Drug Substances and New Drug Products
- OEM Instrument Manuals for Disintegration Test Apparatus (Electrolab, Veego, Labindia, and equivalent manufacturers)

Pankaj Sharma — Quality Control Specialist
Pankaj Sharma is a pharmaceutical QC professional who reviews our technical content for GMP accuracy, laboratory practices, and regulatory relevance.