1.0 Objective: To lay down a procedure for the operation, calibration, and cleaning of the Electronic balance.
2.0 Scope: This SOP is applicable for the operation & calibration of electronic balance in the Quality Control Department.
3.0 Responsibility: Officer, Executive – Quality Control Department.
Head – Quality Control Department
4.0 Procedure for Electronic balance:
4.1 Operation
4.1.1 Ensure the Calibration status of the instrument.
4.1.2 Ensure that instrument is clean and free from dust.
4.1.3 Switch ‘ON’ the mains & level the balance (bubble position in the center.)
4.1.4 Press ‘ON’ of the instrument, Wait for weighing mode, to display 0.0000 g on the balance screen. Now the balance is ready for operation.
4.1.5 Place an empty container or butter paper on which the sample weight is to be taken. Then press ‘O/T’ for tare and place the sample as required. The display will again show the actual weight of the sample. Note the weight.
4.1.6 After weighing is over bring a display to 0.0000 by pressing O/T and press OFF until ‘OFF’ appears.
4.1.7 Operate the balance in the range of 1 mg to 210 g.
Related: SOP on Weighing Balance
4.2 Calibration
4.2.1 Auto calibration
4.2.1.1 Switch On the instrument, wait till weighing mode appears.
4.2.1.2 Press the ‘CAL’ button on the instrument.
4.2.1.3 The instrument start auto-calibrating by shifting the point from decimal to decimal.
4.2.1.4 Calibration is Ok.
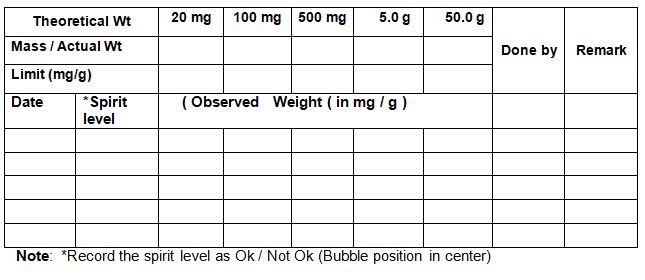
4.2.2 Daily Calibration Record:
4.2.2.1 Daily Calibration Record of balance should be performed.
4.2.2.2 After completion of the internal calibration press tare to zero (0.0000) the display.
4.2.2.3 Place 20 mg standard weight on the pan with help of forceps.
4.2.2.4 Note the displayed weight after the display is stable.
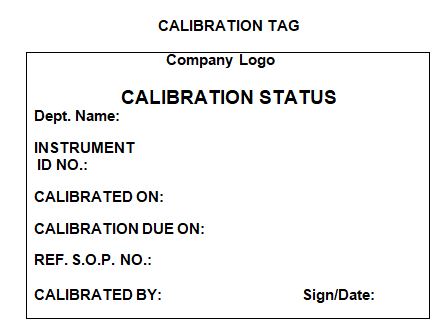
4.2.2.5 Repeat the operation with 100 mg, 500 mg, 5 g, and 50 g standard weights. Note the displayed weight after the display is stable & record it in Annexure- I and affix ‘CALIBRATION TAG’ as per annexure-III.
Related: Daily verification of weighing balance
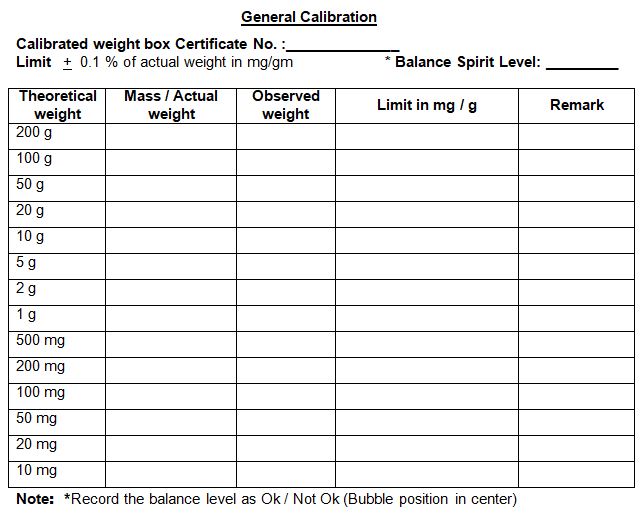
4.2.3 General Calibration:
4.2.3.1 Calibrate the balance with each individual standard weight (200 g, 100 g, 50 g, 20 g, 10 g, 5 g, 2 g, 1 g, 0.5 g, 0.2 g, 0.1 g, 0.05 g, 0.02 g, 0.01 g.) and record the readings in Annexure II.
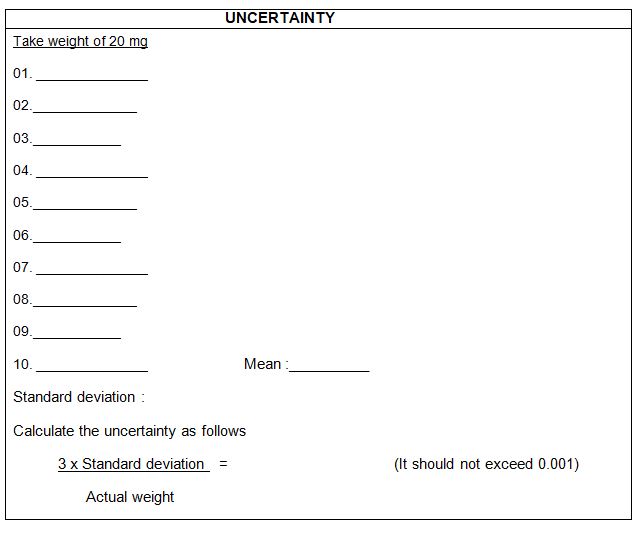
4.2.4 Uncertainty:
4.2.4.1 Take 20 mg standard weight for the uncertainty test.
4.2.4.2 Take at least 10 replicate readings for the same on the balance and note them down.
4.2.4.3 Calculate the standard deviation of the above 10 readings.
4.2.4.4 Calculate the uncertainty as follows

4.2.4.5 It should not exceed 0.001 Record the same in Annexure II.
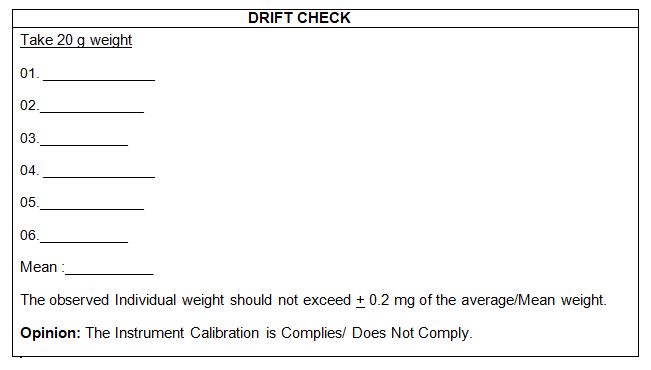
4.2.5 Drift check
4.2.5.1 After completion of internal calibration press tare to zero display.
4.2.5.2 Place 20 g standard weight on the pan.
4.2.5.3 Read the displayed weight after the display is stable and note down the reading.
4.2.5.4 Repeat five times the above procedure at different places on the pan and calculate the average display weight.
4.2.5.5 The average display weight shall be fixed as an average actual weight for the particular balance.
4.2.5.6 The observed weight should not exceed ±0.2 mg of the average/Mean weight and recorded in Annexure -II.
4.2.6 Tolerance
4.2.6.1 Auto calibration test should pass for balance.
4.2.6.2 Daily Calibration Record of balance ±0.1 % of actual weight.
4.2.6.3 General calibration ±0.1 % of actual weight.
4.2.6.4 Uncertainty test should not exceed 0.001
4.2.6.5 Drift check ±0.2 mg of the average weight of 20 g.
4.2.7 Frequency
4.2.7.1 Auto calibration & Daily Calibration Record — Daily or as per company Proceduer
4.2.7.2 General calibration , Uncertainty & Drift check — Every Three Month or as per company Proceduer
4.2.7.3 If an instrument is out of calibration, affix “UNDER MAINTENANCE” and call for the service engineer.
4.2.7.4 Fill in the calibration status on the metallic calibration label of the instrument and record the calibration results in annexure-I & in annexure-II
4.3 Cleaning
4.3.1 Clean the balance Pan properly with a soft brush.
4.3.2 Clean the glass doors with a soft cotton cloth or lint-free cloth.
4.4 Precaution
4.4.1 Balance should be placed on stable, vibration-free, and leveled support.
4.4.2 Balance should not be placed in hazardous areas.
4.4.3 Clean the pan properly before and after use.
4.4.4 Always keep the glass doors of the balance closed.
5.0 Abbreviations:
g: Grams
mg: Miligrams
SOP: Standard Operating Procedure
NA: Not Applicable
6.0 Annexures:
Annexure–I: Daily Calibration Record for Electronic balance
Annexure–II: General Calibration, Uncertainty & Drift Checks for Electronic balance.
Annexure–III: Calibration Tag for Electronic balance
Annexure-I
Annexure-II
Annexure-III

Naresh Bhakar is the Founder and Author at Pharmaguddu.com, bringing his extensive expertise in the field of pharmaceuticals to readers worldwide. He has experience in Pharma manufacturing and has worked with top Pharmaceuticals. He has rich knowledge and provides valuable insights and data through his articles and content on Pharmaguddu.com. For further inquiries or collaborations, please don’t hesitate to reach out via email at [email protected].
